Increasing Enemy Speed With the Predator System
As I write this, the ancient Norse world featured in Assassin’s Creed: Valhalla is currently in the middle of an event akin to Ragnarök itself; indeed, the game is being subjected to the ever transformative process of becoming Omnified.
After delving deep into the game code and establishing some important relationships, we spent some time during the last article implementing the Apocalypse system. That went incredibly well, leaving us with an Assassin’s Creed: Valhalla already more worthy for some playtime by insane gamers like us.
But just having the Apocalypse system implemented is not enough by itself. No, we must continue to trudge forward and shape this game to our will so that we can achieve the perfect levels of insanity. And today we’ll be doing just that, through the implementation of another game-neutral Omnified system: the Predator system.
At the time of writing, I lack a detailed overview article that explores the Predator system. If you, the reader, are unaware of what the Predator system is, then suffice it to say, it is an overhaul to a game’s movement system that provides enemies with an intelligent speed boost based on their proximity to the player.
Essentially, it affords enemies the ability to more quickly get to your ass to deliver murder. If you desire a deeper level of knowledge on the subject, please refer to my general overview video, which will hopefully sate your thirst for Predator-specific knowledge…at least until I have an Omnified Design article out on it.
On the Quest for the Movement Application Code
In order to implement the Predator system into Assassin’s Creed: Valhalla, we need to locate the game’s movement application code. This is code where movement offsets are being applied to a copy of a creature’s location coordinate values, prior to those new values being committed to the proper place in memory, causing the creature to actually move.
This bit of code is not so different from the damage application code, something required for Apocalypse system implementation which we spent quite a bit of time looking for during our last Omnification article for this game.
To find the movement application code, it makes sense to first start off by pinning down where the location update code is, which is something that makes effective the changes to coordinate values brought about by the movement application code. We’ll find it easily by right clicking on one of our coordinates, and choosing Find out what writes to this address.
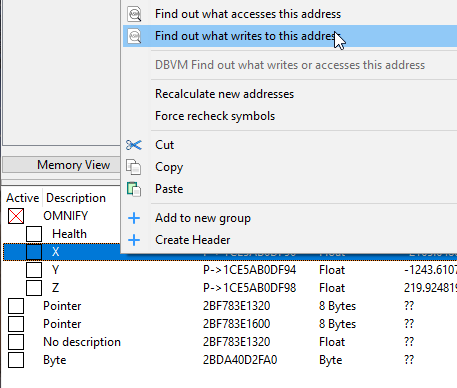
Luckily, when the opcode monitoring window appears in response to the above action, it is completely blank. This is a good thing. The easiest movement systems to work with are ones that only execute a write to a creature’s coordinates when movement actually occurs.
Too many times I’ve had to deal with games that are constantly writing to the coordinate values, even when there is no movement occurring. This makes debugging a pain. I’m glad to see Assassin’s Creed: Valhalla is not one of them.
After making our character move in the game, we immediately get the following in our opcode monitoring window:
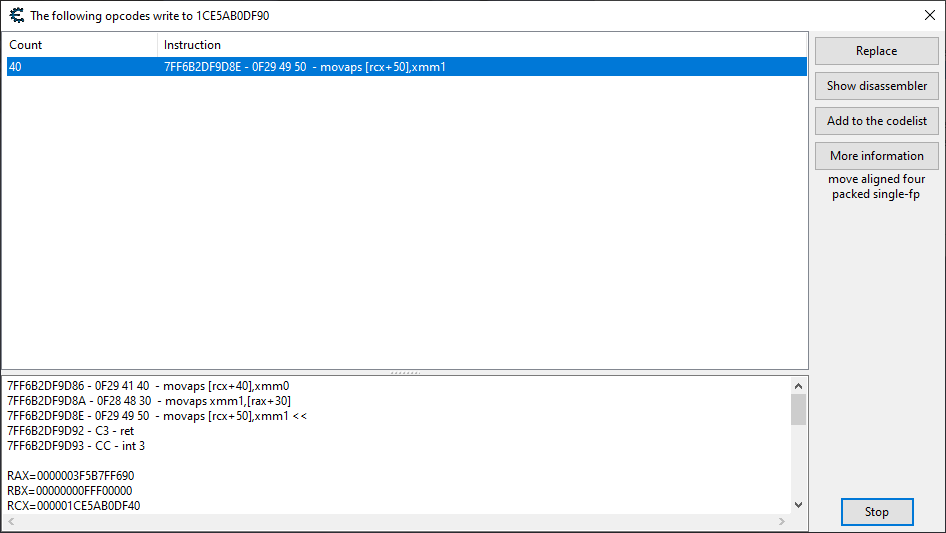
Fabulous. So far everything is proceeding along rather nicely. Let’s hit the Show disassembler button and take a look at the location update code.
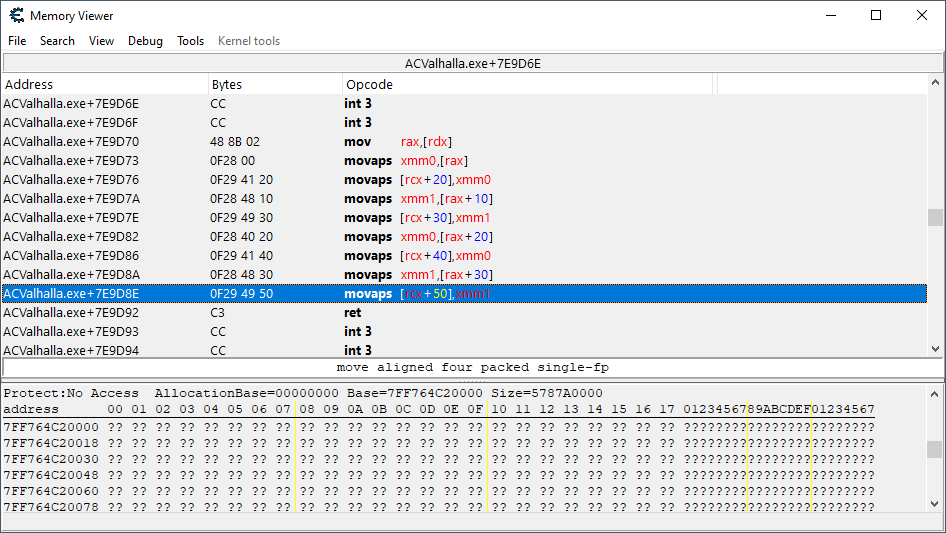
Here it is. In its own little function as well! How cute. It appears that a number of updated values are being read using the rax register and then committed to the live location structure via the rcx register.
The actual location coordinates are found starting at [rcx+50], what the values are in the structure before it ([rcx+20], [rcx+30], [rcx+40]) are unknown to me, but will be reverse engineered if needed.
Taking a raincheck on the matter of these other structure members, our immediate goal is now to locate the code which is responsible for calculating the values that get stored into the region of memory pointed to by the rax register. There are many different ways to begin such a search, but I think that for this exercise we’ll simply be doing an execution trace starting at a few function calls up the stack from here.
Tracing Movement: Where to Start?
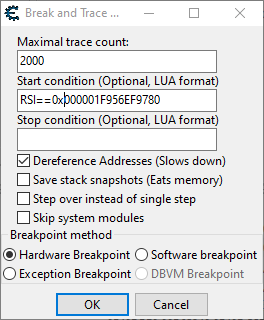
In order to capture the movement application code, we’ll want to strike a balance between having a trace expansive enough to include it, but not so large that the results are unwieldy. We’ll begin by placing a breakpoint at the location update code and then going up a few calls on the stack.
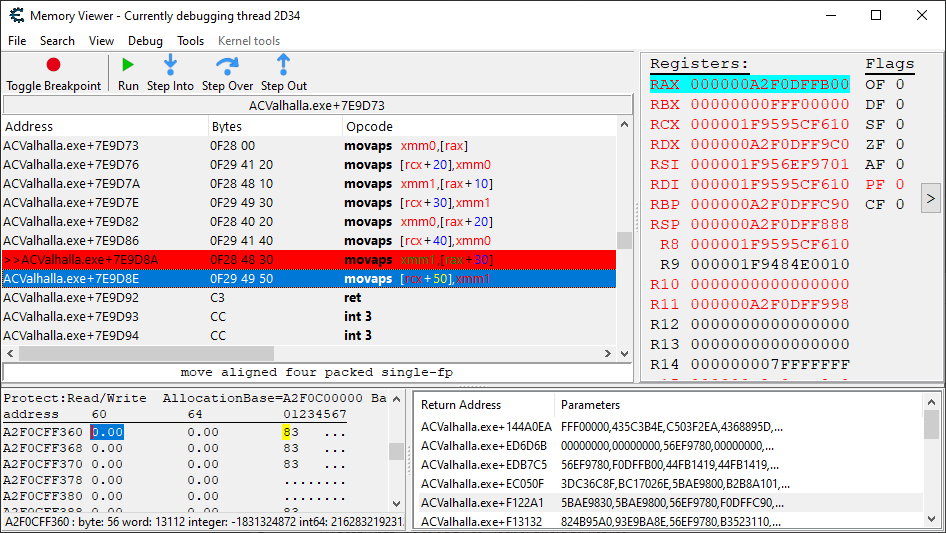
Let’s see if we can make use of the code a few levels up on the call stack. In particular, let’s double click on the ACValhalla.exe+F122A1 entry and see if we can isolate execution there for just our player.

This looks like a good starting point for the trace. It’s five functions up on the call stack, so it should cover quite a bit of code. Plus, the immediate instruction seen here is a normal, static function call. All we need to do, in order to get some use out of it, is isolate the execution of this instruction to only when the player’s coordinates are being updated.
After a bit of trial and error, I was eventually able to get a one to one hit on a breakpoint here (for every hit on the location update’s breakpoint) by constraining the breakpoint to only triggering when rsi was equivalent to 0x1F956EF9780. Not entirely sure what structure this represents at the moment, but it must be some sort of parent to the location structure.
We got everything we need to do the trace. Let’s define our tracing options appropriately, and then get on with it.
Doing the Trace
Our goal here is to have the trace wide enough in order to capture the location update code. If a value is calculated somewhere along the way from this starting point to the location update code, we will hopefully be able to see it.
After running the trace, I was able to confirm that the location update code was indeed captured. Using the typical technique I’ve been using lately of placing a breakpoint on the code of interest and then seeing if it gets swallowed was not a viable option here. This is because the breakpoint will be typically getting hit multiple times for every movement initiated, making it difficult to immediately know whether or not the trace actually included the location update code.
Despite this, confirmation was achieved by simple traversal through the trace log. Unfortunately, no arithmetic operation could be observed among the approximately 2000 instructions this log contained. Indeed, it appeared that the updated coordinate values are already calculated long before the starting code ever hits.
Starting at the very top of the trace log, I went through each instruction slowly until I hit the following:
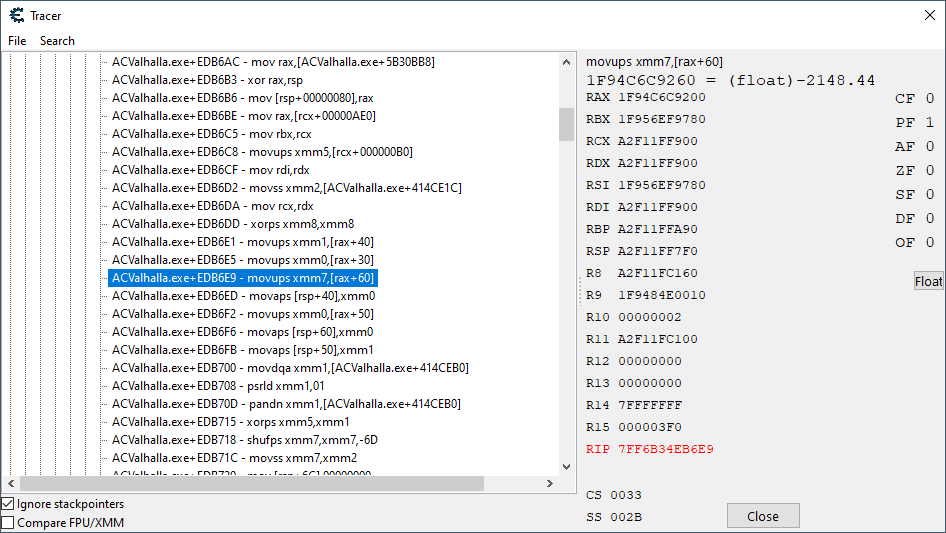
These are coordinate values being loaded from some other creature-specific structure (you can tell simply by the range of memory the address resides in). The instruction is movups xmm7,[rax+60]. Judging by their slight difference from the live coordinates found in the location structure, it appears these values already have a movement offset applied to them.
Even though our trace does not contain the movement application code that we’re interested in, it has given us an important clue, right here near the top. In order to find the movement application code, we were going to have to see what was writing to the address being pointed to by the rax register.
Tracking Down the Updated Coordinate Values
The address assigned to rax remained consistent through each execution of player movement, so it was trivial to add it to our address list and perform some monitoring for instructions writing to it.
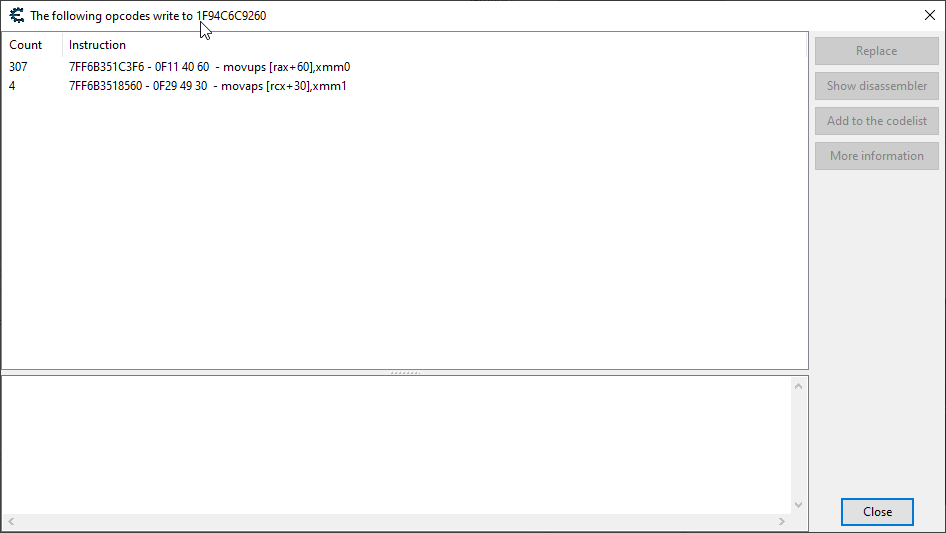
OK, at least there isn’t a ton of code writing to this address. The first instruction shown above would execute constantly, whereas the second instruction only executed during player movement. You would think that the movement application code would be closer to the second instruction then.
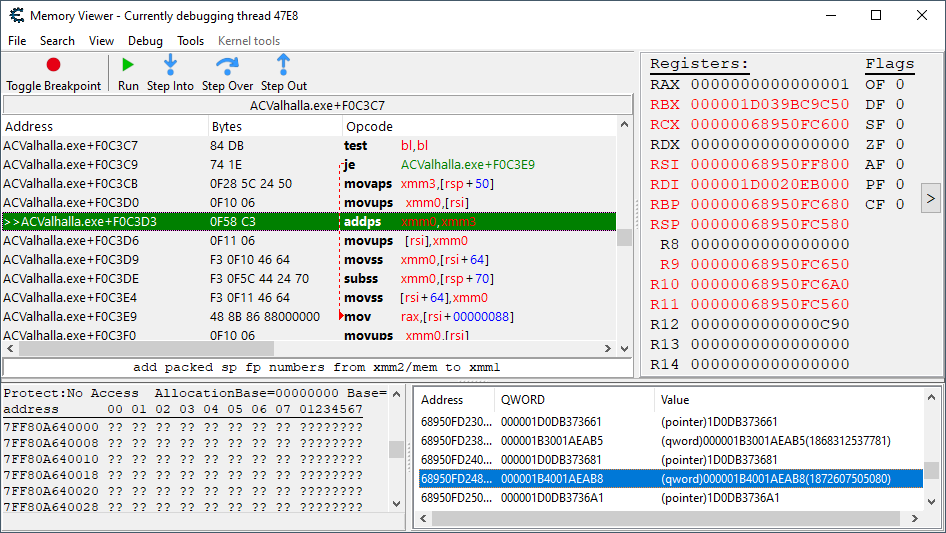
But you’d be wrong. It is actually the first instruction listed here that will ultimately lead us to the movement application code. Clicking the Show disassembler button, we get the following:

Bingo. The addps xmm0,xmm3 is our movement application code. The current coordinates are loaded from temporary memory and stored in the xmm0 register; likewise, the movement offsets are loaded from some other temporary memory and stored in the xmm3 register.
The use of temporary memory here to store values of interest so far from where their retrieval from their original places in memory occurred made locating the movement application code a difficult affair. Nonetheless, we pieced together the clues and got it, baby!
Analyzing the Movement Application Code
Now that we have found the glorious movement application code, let’s take some time to familiarize ourselves with the environment we’ll be operating in with our injected Predator initiation point. More specifically, we need to look into what information is available to us within the context of where the movement application code is executing.
There are several things we need to know prior to executing the Predator system:
- Whether or not it is the player that is moving. Only non-player characters should be given a Predator boost.
- The current coordinates of the creature that is moving.
- The current coordinates of the player.
The current coordinates of the player will be available to us via the playerLocation pointer we created in the first article on Omnifying Assassin’s Creed: Valhalla. Additionally, we already know that the current coordinates of the moving creature can be found in the xmm0 register used in the movement application instruction.
The remaining point of uncertainty is the first item in the list: the identity of the creature actually moving. The coordinate values found in xmm0 are being read from the stack. The structure in memory in which they were originally sourced from (which is what we use to identify the particular creature moving) could have been acquired thousands of instructions ago.
Sometimes, when we get into more generalized regions of code, it can be difficult to find disassembled data structures that are useful. Therefore, it is with a certain level of nervousness that I begin a bit of analysis of this code by placing a breakpoint on it.
I can tell just by looking at the ranges of memory the registers are pointing to that there is not a whole lot of character specific information readily available. All of the addresses starting with 6, for example, are most likely temporary memory used by a number of functions to hold data while said data is being processed.
If we take a look at the data already disassembled for our player (the health, location, and root structures) we can see that all of them are located within the 0x1D1Dxxxxxxx memory space. This must be an area in memory specifically allocated to hold creature-specific data for my character.
So, if we want to have any hope in finding data that might point back to the creature actually moving, we’ll probably want to narrow down our search to addresses in this region. There is clearly nothing like that available among the register values, so I instead take a look at what’s being stored on the stack.
Highlighting around 400 entries or so, I right click and copy the stack data to a notepad to search. Thirty five entries or so into the stack, I stumble on this address:

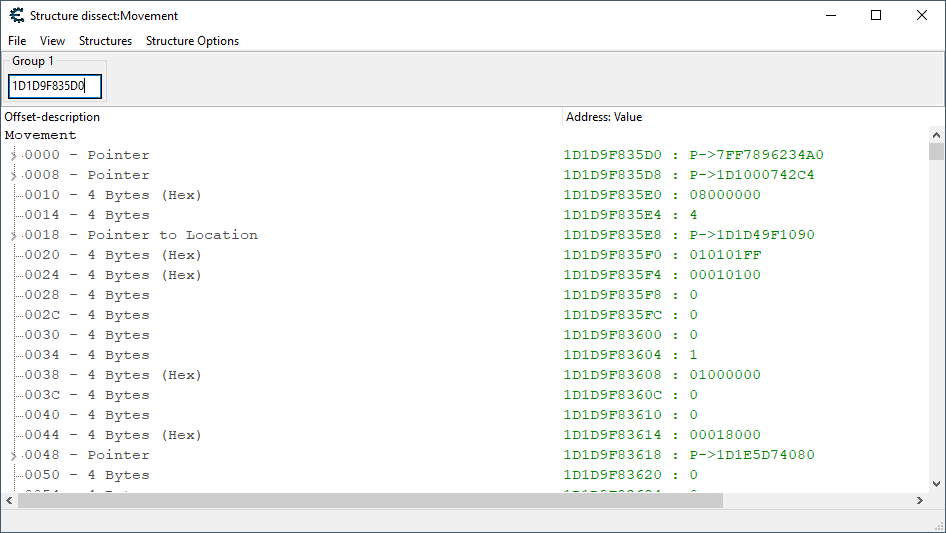
Let’s take a look at this address of 0x1D1D9F835D0. Remember, no RTTI is available, but we’ve been picking up some useful skills lately in the mapping of relational data, so maybe we don’t need it! Let’s take the address, plop it into a Structure dissect window, and define a new kind of structure.
A Structure Linking to Location
We have no idea what to name this structure yet, but we know it might be related to movement, so let’s just name it Movement! Easy. Now, we’ll want to open up Structure dissect windows for every other piece of data we have mapped, and load them up with their known addresses (available via the player, playerHealth, and playerLocation pointers).
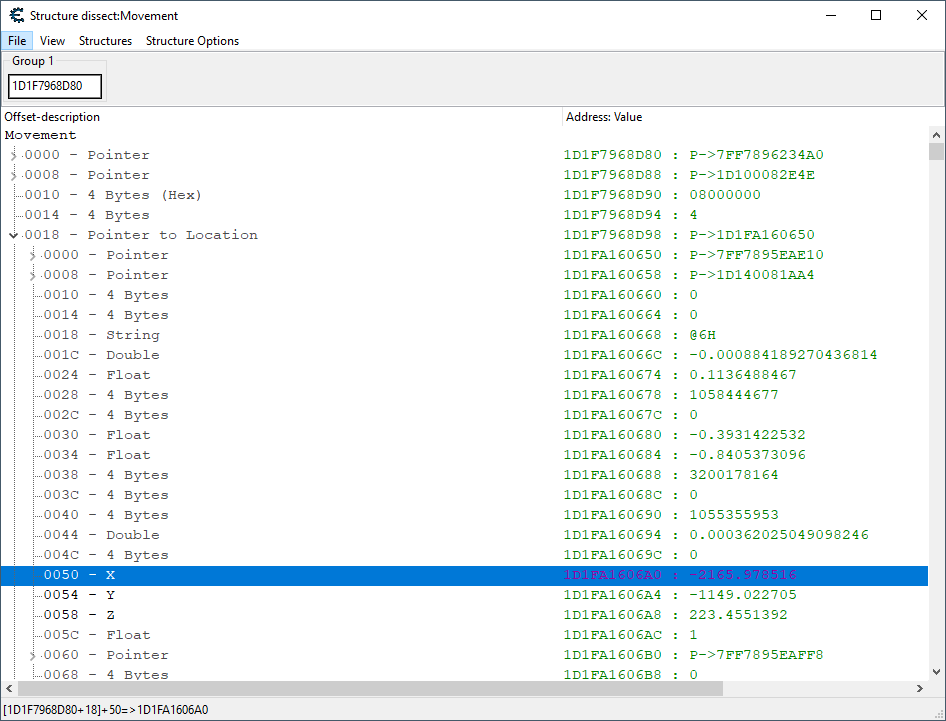
Once this is done, we click on Structure Options -> Find relations. After making sure all the checkboxes are checked (and all the structural definitions have a valid address associated with them), we hit OK. This is going to chart out relations between the structures, listing them as members in each other if any exist.
Awesome! Looks like we have found a pointer to our character’s location structure inside this structure. So, assuming the stack doesn’t violently shift between calls and that the same circumstances apply to non-player characters that are moving, we can conclude that the identity of the creature actually moving can be ascertained by looking at the 0x18 offset in memory pointed to by [rsp+110].
Let’s hit the Run button to see if this data is still available to us. Fingers crossed.
After doing so, we see a shift over to the processing of movement for an entity whose location is markedly different from our player’s (the coordinates in xmm0 reflect this); and, when looking at [rsp+110], we can see that it appears to be pointing to creature-data once again.
Fantastic! We should have everything we’re going to need in order to put in the Predator system! Let’s get to writing that code then.
Piecing Together the Predator Initiation Hook
Alright. We’re going to be initiating the Predator system at "ACValhalla.exe"+F0C3D3, as previously stated. Let’s see what our starting template for the hook is going to look like.
Predator Initiation Hook – Template
// Initiates the Predator system.
// Unique AOB:0F 58 C3 0F 11 06 F3
define(omnifyPredatorHook, "ACValhalla.exe" + F0C3D3)

assert(omnifyPredatorHook, 0F 58 C3 0F 11 06)
alloc(initiatePredator,$1000, omnifyPredatorHook)

registersymbol(omnifyPredatorHook)

initiatePredator:

initiatePredatorOriginalCode:
  addps xmm0,xmm3
  movups [rsi],xmm0
  jmp initiatePredatorReturn


omnifyPredatorHook:
  jmp initiatePredator
  nop
initiatePredatorReturn:
There it is. The start of it all. We need to initiate the Predator system and ensure the movement offsets stored in xmm3 are updated to their Predator-determined values before they’re applied to the current coordinates by the code found under the initiatePredatorOriginalCode label.
As I’ve stated multiple, multiple times in the past: at the time of writing, I have not yet published a general overview article on the Predator system! This is now when I would reference said article, pointing you to the appropriate place where all initiation point requirements would be laid out in full.
When this overview article does become available, more complete information will be able to be found within it! Until then, I appreciate your patience, and I will simply provide to you a terse list of the required parameters for the system:
- X, Y, and Z coordinates for the player.
- X, Y, and Z coordinates for the moving enemy.
- Width, Height, and Depth scales for the moving enemy.
- X, Y, and Z movement offsets for the enemy.
Since all of the values in each item are stored in memory contiguously, supplying the Predator system with the required set of parameters only requires four push (or push equivalent) instructions.
Preparing all these parameters should be fairly simple, with only some slight stack manipulation magic required in light of the fact that the enemy coordinates and movement offsets are stored in SSE registers. The Predator system expects the sets of parameters to be pushed on the stack as if a push m32 type instruction occurred, so a bit of reordering needs to be done if the values are instead being stored in an SSE register.
Other than that, the only thing to keep in mind is that we’ll need to be looking at [[rsp+110]+18] to get the address of the moving creature’s location structure, which will be used for purposes of identification.
Although we’ll be checking for target identity at the start, we will still need to account for backing up our conditional flags (2 bytes) as well as pushing two registers (8 bytes worth of data each) to the stack in order to deal with dereferencing the pointer. This is going to move the identity data to [[rsp+122]+18].
Without further adieu, I present to you: the initial preparatory code for the Predator initiation hook.
Predator Initiation Hook – First Steps
initiatePredator:
  pushf
  // Ensure that the player location struct has been initialized.
  push rax
  mov rax,playerLocation
  cmp [rax],0
  pop rax
  je initiatePredatorOriginalCode
  // Ensure that the moving entity is not the player.
  push rax
  push rbx
  // An interim data structure linking to the creature's location
  // structure can be found on the stack.
  mov rax,[rsp+122]
  // The location structure is found at the 0x18 offset of this
  // interim structure.
  mov rbx,[rax+18]
  mov rax,playerLocation
  cmp rbx,[rax]
  pop rbx
  pop rax
  je initiatePredatorOriginalCode
  // Backing up a few SSE registers we'll be using to perform a little
  // memory management.
  sub rsp,10
  movdqu [rsp],xmm0
  sub rsp,10
  movdqu [rsp],xmm1
  // Backing up the registers used by the Predator system to hold its
  // return values.
  push rax
  push rbx
  push rcx
Execution of the above code will ensure that:
- the required pointers of ours have been initialized,
- all register data at risk of being overwritten is preserved, and
- that the player will not be receiving any Predator speed buffs.
We’ll need to modify this a little bit if we want to throw in any kind of modification to the player’s speed, which I typically do for each game as the audience watching my stream can purchase speed buffs for my character using channel points…you know, to help me out. Sometimes people feel bad for me when I’m getting absolutely destroyed in a game.
Next, let’s get on with the primary parameter preparation and Predator function execution code.
Predator Initiation Hook – Function Execution
initiatePredatorExecute:
  // The player's coordinates are pushed as the first parameter.
  mov rax,playerLocation
  mov rbx,[rax]
  push [rbx+50]
  push [rbx+58]
  // Parameters values are expected to have been pushed to the stack as
  // if a m32 operand was used. Since two of the parameter sets are on
  // SSE registers, we'll need to split low and high words, and then
  // dump them onto the stack as quadwords (low and then high).
  movhlps xmm1,xmm0
  // Lets push the target's coordinates as the second parameter.
  sub rsp,8
  movq [rsp],xmm0
  sub rsp,8
  movq [rsp],xmm1
  // An identity matrix is used as we have not made the determination as
  // of yet as to whether the game uses true scaling or not.
  // We pass this as the third parameter.
  movss xmm0,[identityValue]
  shufps xmm0,xmm0,0
  sub rsp,10
  movdqu [rsp],xmm0
  // Now we split up the movement offset SSE register.
  movhlps xmm1,xmm3
  // Lets push the target's movement offsets as the final parameter.
  sub rsp,8
  movq [rsp],xmm3
  sub rsp,8
  movq [rsp],xmm1
  // Time to execute dat Predator system.
  call executePredator
Here’s the meat and potatoes of the whole thing. We need to do a bit of juggling to get the values originating from SSE registers onto the stack properly, but other than that it is pretty straight forward.
Once that call executePredator is done, we’ll have the rax, rbx, and rcx registers set to the new movement offsets. But, those values aren’t going to do anything just sitting in those registers! Nope, we need to get those new offset values back into that xmm3 register so the game will use them.
That’ll be handled in our return value processing section, which I shall provide to all of you now.
Predator Initiation Hook – Return Value Processing and Cleanup
initiatePredatorExit:
  // We'll need to make some room on the stack for temporary use so
  // we can load updated values back onto the SSE register used by
  // the original code to apply the movement offsets.
  sub rsp,10
  // Start with the original movement offsets.
  movups [rsp],xmm3
  // Apply the updated offsets.
  mov [rsp],eax
  mov [rsp+4],ebx
  mov [rsp+8],ecx
  movups xmm3,[rsp]
  add rsp,10
  // Restore backed up values.
  pop rcx
  pop rbx
  pop rax
  movdqu xmm1,[rsp]
  add rsp,10
  movdqu xmm0,[rsp]
  add rsp,10
That’ll do it. The power of the Predator system has now been injected forcefully into the old Norse world of Assassin’s Creed: Valhalla.
Almost. We’ll need to do some initial tuning of the Predator system’s external parameters. There are some obvious ones we’ll be configuring now; other parameters may need be fine tuned during playtesting of the final product.
Predator Initiation Hook – External Parameters
skipBoostY:
  dd 0

skipBoostZ:
  dd 1
At the outset, we just need to inform the Predator system that it is the Z axis which is the vertical axis, not the usual Y axis. Eventually I’ll marry the Apocalypse system parameters that control the very same thing with these — maybe as some type of Omnified global parameter.
Eventually.
Well? Is It Working?
After injecting this code into the Assassin’s Creed: Valhalla executable, my level of excitement towards getting to play an Omnified version of this game started going way, way up. This is going to be fun.
Let’s take a look at what kind of difference some of this Predator funk makes by adding it to the game:
Before Predator (Normal Speed)
After Predator
Right after the enemy ran up to me in that last shot, he hit me with a 69x damage effect completely murdering my player. I cannot wait to play this!
Other than the sometimes (many times?) ehhhh storylines, my biggest problem with the games in this series has always been the gameplay snoozefest brought about by the game being too easy. But, up that difficult a notch (or 11 notches), and these games become very fun for me.
This is going to be real fun.
Extra Credit Time: Player Speed
The Predator system, like the majority of my game-neutral hacks, is only intended to give enemies an edge. That’s the whole point, ya know. So it has no effect at all on our player’s speed.
Despite this, as I mentioned earlier, I let my viewers redeem channel points on my stream to give my character a lovely 5 minutes of 3x player speed. Support for this kind of thing doesn’t happen by itself, we’ll need to add it.
Well, the perfect place to manipulate the speed of the player happens to be the same place we’re tweaking the speed for the enemy: the movement application code.
Instead of bailing out of our hook entirely when we detect the player, we’ll deviate to an applyPlayerSpeed label and apply a playerSpeedX parameter (which will of course default to 1.0).
We’ll also be making some minor rearrangements to allow for both execution paths to share as much common ground as possible. We’ll need to do some additional stack math, so expect the offset used to acquire the location structure to change once again. Lets start with reworking the first steps of the hook to support two execution paths.
Predator Initiation Hook – First Steps with Player Speed
initiatePredator:
  pushf
  // Ensure that the player location struct has been initialized.
  push rax
  mov rax,playerLocation
  cmp [rax],0
  pop rax
  je initiatePredatorOriginalCode
  // Backing up a few SSE registers we'll be using to perform a little
  // memory management.
  sub rsp,10
  movdqu [rsp],xmm0
  sub rsp,10
  movdqu [rsp],xmm1
  // Backing up the registers used by the Predator system to hold its
  // return values.
  push rax
  push rbx
  push rcx
  // If it is the player moving, we'll want to avoid Predator execution
  // and simply apply the player speed modifier.
  // An interim data structure linking to the creature's location
  // structure can be found on the stack.
  mov rax,[rsp+14A]
  // The location structure is found at the 0x18 offset of this
  // interim structure.
  mov rbx,[rax+18]
  mov rax,playerLocation
  cmp rbx,[rax]
  je applyPlayerSpeed
As you can see from looking at the code, if the player is the one moving, then execution will shift to a new label: applyPlayerSpeed. Otherwise, execution continues to the same old initiatePredatorExecute label whose code has been provided above already.
Let’s look at the new player speed multiplier application code.
Predator Initiation Hook – Apply Player Speed
applyPlayerSpeed:
  // We'll be applying the player speed multiplier to all movement offsets
  // except the Z (vertical) offset.
  sub rsp,10
  // We want to preserve the Z offset before applying the multiplier.
  movups [rsp],xmm3
  mov ecx,[rsp+8]
  movss xmm0,[playerSpeedX]
  shufps xmm0,xmm0,0
  mulps xmm3,xmm0
  movups [rsp],xmm3
  // Load the modifier X and Y offsets.
  mov eax,[rsp]
  mov ebx,[rsp+4]
  add rsp,10
Don’t forget we’ll need to provide a default value for the new playerSpeedX parameter as well.
Predator Initiation Hook – Player Speed Parameter
playerSpeedX:
  dd (float)1.0
And there you have it. Worked first try too. Everything acted as it did before, except the player speed can now be manipulated via its new parameter.
Predator System Has Been Implemented
That’s a wrap folks. We’ve successfully connected our second Omnified system to Assassin’s Creed: Valhalla. Enemies move faster than the speed of sound and strike harder than that feeling of despair hits you when suddenly realizing you have no pants on while in public.
Now that you’ve seen all the bits and pieces involved in its implementation, here’s the complete source code.
Predator Initiation Hook – Complete
// Initiates the Predator system.
// Unique AOB:0F 58 C3 0F 11 06 F3
// xmm0: Target's current coordinate values.
// xmm3: Target's movement offsets.
define(omnifyPredatorHook, "ACValhalla.exe" + F0C3D3)

assert(omnifyPredatorHook, 0F 58 C3 0F 11 06)
alloc(initiatePredator,$1000, omnifyPredatorHook)
alloc(identityValue,8)
alloc(playerSpeedX,8)

registersymbol(omnifyPredatorHook)
registersymbol(playerSpeedX)

initiatePredator:
  pushf
  // Ensure that the player location struct has been initialized.
  push rax
  mov rax,playerLocation
  cmp [rax],0
  pop rax
  je initiatePredatorOriginalCode
  // Backing up a few SSE registers we'll be using to perform a little
  // memory management.
  sub rsp,10
  movdqu [rsp],xmm0
  sub rsp,10
  movdqu [rsp],xmm1
  // Backing up the registers used by the Predator system to hold its
  // return values.
  push rax
  push rbx
  push rcx
  // If it is the player moving, we'll want to avoid Predator execution
  // and simply apply the player speed modifier.
  // An interim data structure linking to the creature's location
  // structure can be found on the stack.
  mov rax,[rsp+14A]
  // The location structure is found at the 0x18 offset of this
  // interim structure.
  mov rbx,[rax+18]
  mov rax,playerLocation
  cmp rbx,[rax]
  je applyPlayerSpeed
initiatePredatorExecute:
  // The player's coordinates are pushed as the first parameter.
  mov rax,playerLocation
  mov rbx,[rax]
  push [rbx+50]
  push [rbx+58]
  // Parameters values are expected to have been pushed to the stack as
  // if a m32 operand was used. Since two of the parameter sets are on
  // SSE registers, we'll need to split low and high words, and then
  // dump them onto the stack as quadwords (low and then high).
  movhlps xmm1,xmm0
  // Lets push the target's coordinates as the second parameter.
  sub rsp,8
  movq [rsp],xmm0
  sub rsp,8
  movq [rsp],xmm1
  // An identity matrix is used as we have not made the determination as
  // of yet as to whether the game uses true scaling or not.
  // We pass this as the third parameter.
  movss xmm0,[identityValue]
  shufps xmm0,xmm0,0
  sub rsp,10
  movdqu [rsp],xmm0
  // Now we split up the movement offset SSE register.
  movhlps xmm1,xmm3
  // Lets push the target's movement offsets as the final parameter.
  sub rsp,8
  movq [rsp],xmm3
  sub rsp,8
  movq [rsp],xmm1
  // Time to execute dat Predator system.
  call executePredator
  jmp initiatePredatorExit
applyPlayerSpeed:
  // We'll be applying the player speed multiplier to all movement offsets
  // except the Z (vertical) offset.
  sub rsp,10
  // We want to preserve the Z offset before applying the multiplier.
  movups [rsp],xmm3
  mov ecx,[rsp+8]
  movss xmm0,[playerSpeedX]
  shufps xmm0,xmm0,0
  mulps xmm3,xmm0
  movups [rsp],xmm3
  // Load the modifier X and Y offsets.
  mov eax,[rsp]
  mov ebx,[rsp+4]
  add rsp,10
initiatePredatorExit:
  // We'll need to make some room on the stack for temporary use so
  // we can load updated values back onto the SSE register used by
  // the original code to apply the movement offsets.
  sub rsp,10
  // Start with the original movement offsets.
  movups [rsp],xmm3
  // Apply the updated offsets.
  mov [rsp],eax
  mov [rsp+4],ebx
  mov [rsp+8],ecx
  movups xmm3,[rsp]
  add rsp,10
  // Restore backed up values.
  pop rcx
  pop rbx
  pop rax
  movdqu xmm1,[rsp]
  add rsp,10
  movdqu xmm0,[rsp]
  add rsp,10
initiatePredatorOriginalCode:
  popf
  addps xmm0,xmm3
  movups [rsi],xmm0
  jmp initiatePredatorReturn


omnifyPredatorHook:
  jmp initiatePredator
  nop
initiatePredatorReturn:


identityValue:
  dd (float)1.0

playerSpeedX:
  dd (float)1.0

skipBoostY:
  dd 0

skipBoostZ:
  dd 1
With the Predator implementation complete, we’ll be working on implementing the last of our primary Omnified systems next: the Abomnification system. Hopefully that won’t be too horrific.
Remember, once this game is Omnified, I’ll be broadcasting the official playthrough of it live on my stream at https://twitch.tv/omni. Although I am biased, I must say there is nothing quite like an Omnified playthrough out there. Rage, desperation, and grim determination in the face of indescribable odds; both from the game, and from things outside of the game.
So, if you enjoy this content, I hope you will continue to consume it here, but I also hope that you’ll join me on my stream and say hello. If you can’t wait and want to say hello right now, or if you need to be notified when I do go live, check out my Discord server at https://discord.gg/omni.
Until next time, thank you for your interest, and go forth with passion!
~Omni