
Time to go big baby. After some initial poking around, we implemented the Apocalypse system and the Predator system into The Witcher 3. It’s time to put in the star of the show: the Abomnification system. For those not in the know, this is my game-neutral system which causes characters in a game to change into random shapes and sizes at randomly determined speeds.
Implementing it is always one of the most challenging tasks as far as reverse engineering goes in the business of making games Omnified. Plenty of folks have used tools like Cheat Engine to figure out a creature’s health or maybe prevent a player’s health from going down; not so many probably have gone so far as to use it to mold the very makeup and look of entities in the game.
That’s why these particular articles are always a joy to write. I’ll be going over how I found the code responsible for rendering creatures (which we need to hook into), as well as everything I had to do in order to be able to get everything to look like we’re on a giant acid trip. There’ve also been some notable changes from previous implementations of the Abomnification system, and I’ll be going over that as well.
How Do We Affect Scale?
The Abomnification system doesn’t manipulate a creature’s size and shape using discrete units, but rather through the use of dimensional scale multipliers (width, height, and depth of course). We need to figure out how we can take these scale multipliers and cause a creature’s model to change accordingly. Sometimes this can be very easy; if it’s not easy, it’s going to be pretty hard.
Changing a creature’s scale was typically not that difficult in older games, particular ones that used the Unreal engine. I’ve also observed most of CAPCOM’s games, with their MT engine, also being rather easy in the scale-manipulation department. That’s because these games typically would package the scales of a creature in the form of three floating point values (one for each dimension) very close to the locational coordinates of the creature. I refer to this kind of feature in a game as easy scaling support.
Implementing the Abomnification system into games with easy scaling support is…well, easy! Incredibly easy. But the majority of games that I’ve Omnified since Omnifying became a thing over a year ago have not had easy scaling support (no easily manipulated dimensional scale floats that I could find, at least).
That’s because most of the games I’ve Omnified are somewhat newer, and newer games are simply more complicated. These days, you’re only really going to run into easy scaling support if there happens to be a character creation process where the height, width, or even depth of a character can be customized by the player. Even with character creation, however, that’s not always the case; just check out my Abomnification articles for Dark Souls to see what I mean.
Spoiler alert: no easy scaling exists in The Witcher 3.
Sorry jack, but given the complexities involved with even just the basic coordinate systems in this game, we’re not going to be running into a panacea for all our scaling woes so easily in this game. Also, this game appears to be using Scaleform as its engine, and every time I’ve had to hack games using that engine, I’ve had to do it the hard way.
The easy way isn’t going to be happening. We need to set forth and find pliable code essentially responsible for rendering our character’s model.
Where Is the Character Model Rendering Code?
Finding your HP is one thing; figuring out where the code is that decides how big to make Yennefer’s butt is quite another thing altogether. We’re basically looking for code that calculates and stores something akin to 3×4 matrix values that, in the end, define the physical characteristics of a creature in three dimensional space. This is a difficult task, and while I think (and hope) I’m getting better at this with every game I do, but I always remember to thank my lucky stars whenever I manage to figure it out.
The code we’re interested in is typically where a mesh of polygons is being formed for a character through the processing of various edges and vertices. If I’m not mistaken (and don’t ever forget, I’m always completely guessing as to what the hell I’m ever looking at when doing this…that is essentially what reverse engineering is my friend: making up your own lingo and deducing the arcane), I believe the data we end up affecting are essentially vertex matrices, with each value representing the distance from some other point in the plane.
If these values increase, the distance between one point and another point increases. If they decrease, the distance decreases. If I double all the values that I’ve identified to correspond to a particular dimension, let’s say the height, well that should then hopefully double the height of the creature.
In order to find the code, we must search for changes in memory that correspond to increases and decreases in the distances between vertices on a character’s model. Luckily, we don’t need any black magic arcana for this — we effect changes to our character’s model all the time simply by moving.
Crouching for Success…Oh Wait…
My favorite type of “polygonal distance change” to track corresponds to the character crouching and uncrouching. As the character crouches, we’re decreasing the distances between vertices since the player is getting all bunched up. As we uncrouch, the distances increase. Very easy to track.
Unfortunately Geralt, our hero in The Witcher 3 of course, doesn’t appear to enjoy the act of crouching. There’s really no way to do such a thing in the game — perhaps it’s beneath our hero to do so. The closest, repeatable action I could come up with was him jumping up into the air.
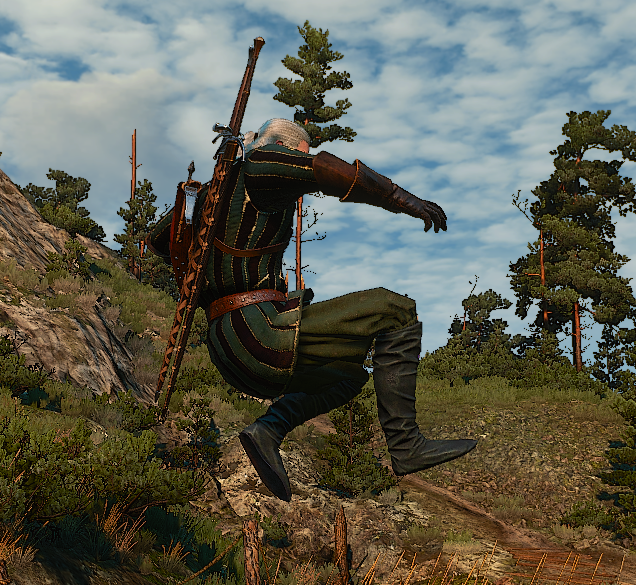
As Geralt is reaching the height of his jump he is also bringing in his knees towards his torso. He is decreasing the distance between the vertices in his body; he is getting all nice and bunched up. When searching for our vertices, we want to do a search for Decreased values as he brings his knees up, and Increased values as he extends his legs back down to the ground.
This is all very hard to do as fast as mighty Geralt manages to jump, of course. Also, there’s going to be a lot of unwanted noise skewing the results of our search (there’s tons of crap going on the game between jumps). When looking for difficult values like this, it is best to find a location for a breakpoint that, when set, allows us to slow the execution down to something akin to frame-by-frame. For my breakpoint, I’ll be using where we hook into the Predator system, with a condition set for break for a particular creature’s movement.
By having hotkeys set, one for continuing execution, and the others searching for decreased and increased values, I can do an Unknown initial value type floating point search and accurately signal to Cheat Engine when those character model edge vertices are contracting and expanding. All of this is exactly what I did when looking for a rendering function to hook into.
And, spoiler alert again: I found it — first try. Mwahah.
Maybe I’m good, but I was also (I’m pretty damn sure) lucky as hell. There’s a lot of different functions that contribute towards a model’s calculated skeleton, if you will, but we’re only going to be interested in a particular few (most notably, whatever gives us some influence over all the various dimensional scales we need to screw with).
Let’s go over what that search looked like. After performing the search in the way I just described, I had a number of values remaining:
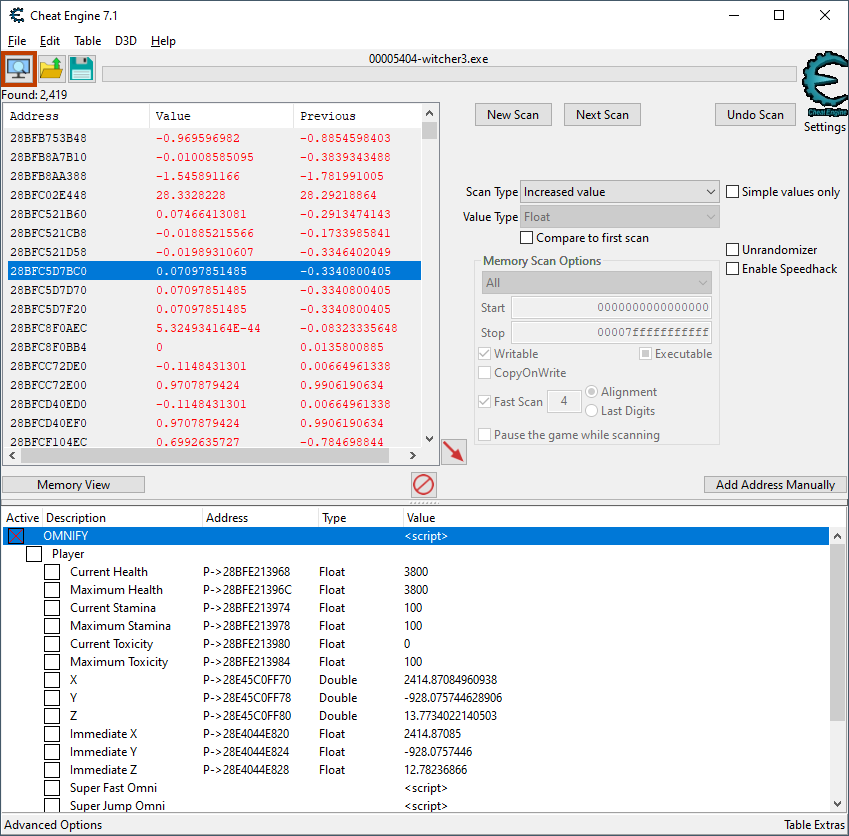
OK. We still are looking at a couple thousand values, but a bunch of the values seemed to be falling in a good range, at least as far as what I was expecting (small values between -1 and 1 typically). Here’s what I got from checking what code was writing to the very first value I selected from the list:
When looking for rendering code, I usually am interested in code that looks like it is updating an entire 3×4 matrix row, a row ideally pertaining to a single dimension. Instead of a mov instruction we’d be looking at something like a movaps instruction, which would be dumping in four floating point values instead of one.
There’s definitely nothing saying that it has to be like that — it’s just what I’m used to. Sort of a silly notion to even dwell on, in this chaotic, unforgiving, and unpredictable machine world. Only one way to see if this code is any good: seeing what happens if we screw with some of the values.
Our Chosen Rendering Code? Let’s Screw With Values!
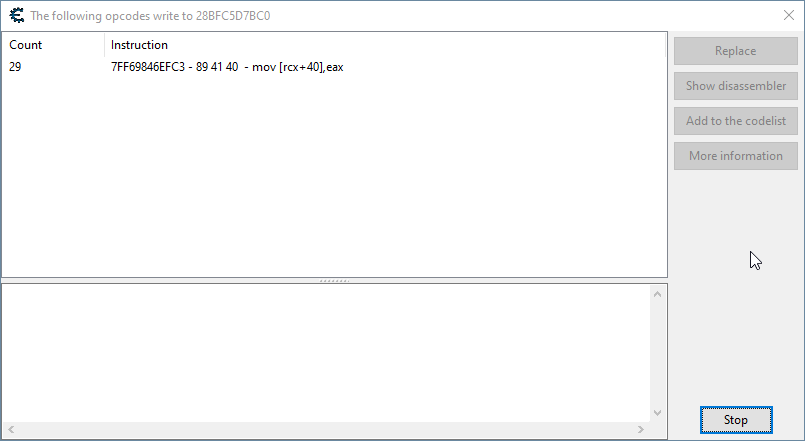
Let’s take a look at this maybe-rendering-function.
Not exactly what I was used to. Individual floats are being transplanted from one data structure to another. That part, at least, is essentially what these rendering functions look like, although sometimes there’s some manipulation going on between read and write. Frankly, if there isn’t any manipulations happening, then I suppose that is good as it means we might be in a straight up copy function from some sort of model skeleton.
So, to test this out, I wrote a test hook and doubled some of the values getting saved to some of the rcx offsets. Wonder what’s going to happen…

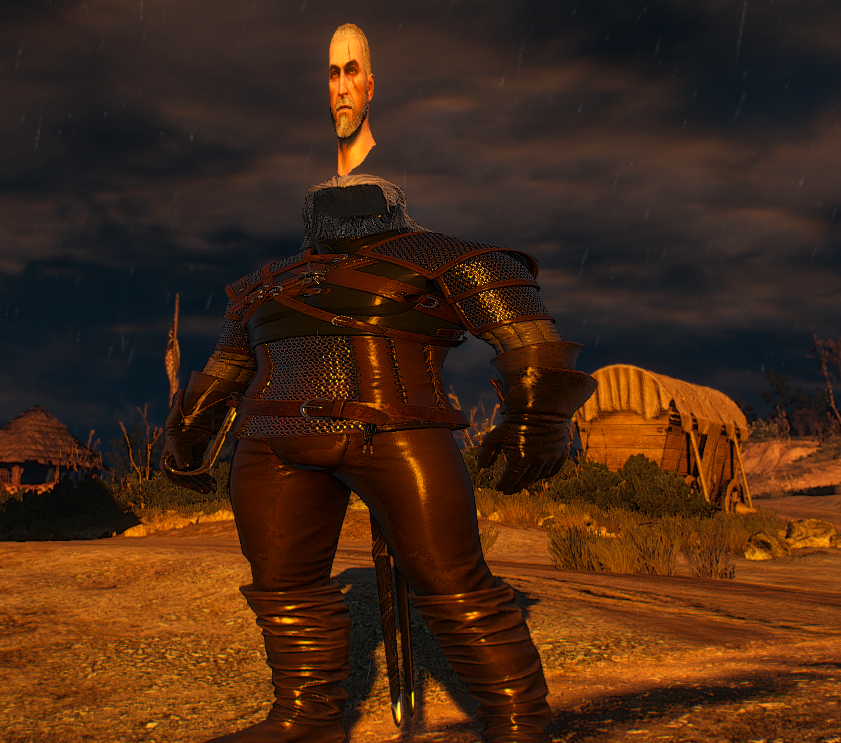
That is a wider head. That is not normal. Great! Fabulous! By doubling one of the floats, I’ve doubled Geralt’s head width! Only his head width — which is interesting. Typically I’d expect the entire body, including head, to be doubled. Hopefully we’ll find another value that affects the body as well…let’s change some other stuff.
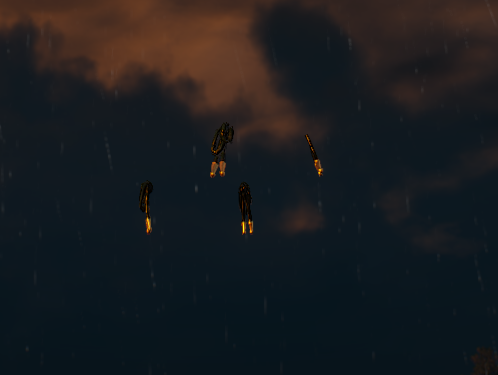
Don’t know what’s happening here, and I’m scared. Let’s try some other places in memory…
Oh hell yeah. That’s a nice, thicc, wide body baby. Also, the head appears to be disconnected. That is slightly alarming, but I’ve seen enough to know that we’ve found the place in code where we can essentially implement our own custom scaling function.
Reverse Engineering the Rendering Data
Great. We have found where we can mold the shapes of characters to our will. That’s frankly the easy part. The hard part is building a semblance of understanding as to the nature of the various data structures involved in rendering, and answering the ultimate question: how do I associate what’s being rendered to known character data?
That’s a strong requirement of the Abomnification system. Morphing is per-creature; one creature’s scales are distinct from another creature’s scales. This can only be achieved by being able to identify an entity from its rendering data. This is sometimes very difficult, and in fact was so difficult in this game it resulted in me figuring out a new, better way to do things. Insert smiley face.
What We Need To Do
Remember, there are two parts to an Abomnification system implementation for games that lack easy scaling support:
- A hook that generates the next dimensional scales for a creature. The Abomnification initiation point.
- A hook that applies the generated scales for the creature. The custom scaling function.
Abomnification system morphs are smooth and many — we don’t want to generate new scaling dimensions during the render pass, that is doing too much in a performance critical part of code. Also, it would result in morphing progressions that were way to fast to see. We typically generate the next set of scales for a creature in code that is executing much less frequently than the typical rendering method.
In most games, I’ve had scales get generated in code that is doing some sort of polling with the coordinates of various entities. This has led to the coordinate data structures of these entities becoming what we use as the identity for generated scales during scale application. Therefore, we needed to be able to find a creature’s coordinates while operating within rendering code.
Whether we use the coordinates of a creature or not, we must be able to find some kind of data structure within the rendering code that is guaranteed to only be associated with the creature being rendered.
The Important Rendering Data Structures
I spent quite some time looking around the nearby code and memory for data structures we could make use of. In short, there was no easy link between known character data and the rendering data. But we did find some links. Let’s go over what data structures we need to know about here.
CRenderProxy_Mesh
This is essentially the bread and butter of what is getting rendered. It is the data structure being written to in the code snippet shown some paragraphs above, pointed to by the rcx register. There are literally thousands of these things being processed at any given point in time — not surprising, this is graphics-related. This game ain’t stick figures.
This is not the only type of data structure that receives these rendering parameters, but it is by far the most common. Here’s a very tiny look at its contents:
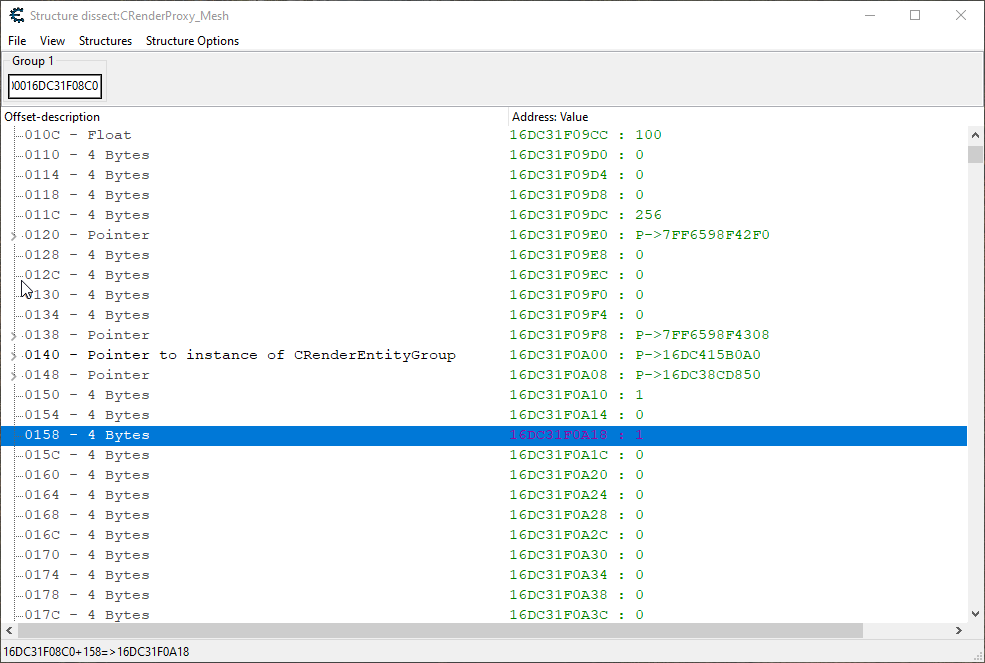
I have it scrolled down to offset 0x140 as the type we see there becomes very important later on.
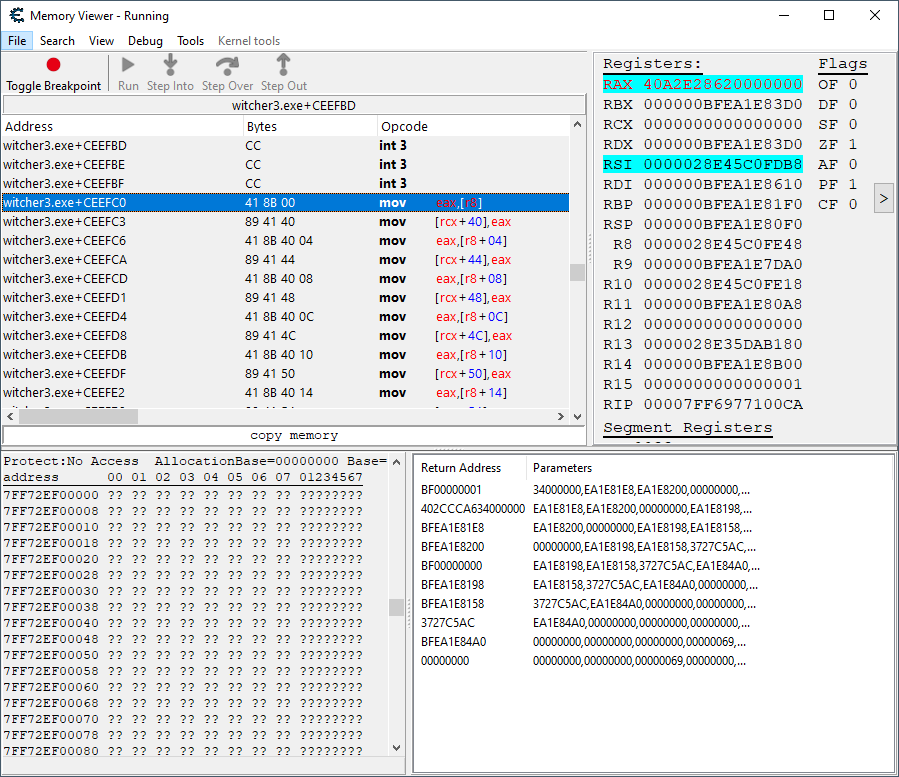
While CRenderProxy_Mesh is the ultimate destination of the values we’ll be influencing via the Abomnification system, we actually won’t be writing to it ourselves — rather we’ll be writing to the data structure holding the values that the game is going to be copying into the mesh data structure. That particular data structure was being pointed to by r8 in the previous code, and it is an unnamed structure.
We need to figure out what floating point values influence what aspects of our character in the game. Since we’ll be manipulating the values in r8, the offsets that are to be disclosed here will be pertaining to that data structure. To figure out what the corresponding entry is on the CRenderProxy_Mesh, simply add 0x40 to the offsets provided below.
So, in order to figure out what was what, I simply manipulated each value with code and recorded what happened. Did it live on stream, in fact. Let’s see what we got.
Rendering Parameter Offsets ([r8])
0x0: Width for the body when the character is facing north or south. Indeed, if the character is facing east or west this has no effect on the character’s model. It has nothing to do with camera position and orientation. First time I’ve ever seen this sort of thing, but hell, you all know I’m not a game dev!0x4: Width for the body when the character is facing east or west.0x8: Height and also somewhat a vertical offset for the head. In order to keep the head in sync with the rest of the body’s height, a bit of a mathematical function had to be devised. It’s not perfect, but it compensates somewhat adequately for the large gap that will appear between the body and head at identical height scaling values.
To make matters worse, it just is not possible to keep the head in sync with the body once the body starts getting small enough. That is…unless you invert the head! Yes. The top of the head will touch the base of the neck. Hey! At least it connects, sort of!
The function I’ve devised looks like:
heightHead = 3.2 * heightBody – 2.12
All of this is needed because it appears most human characters have heads that have separate models from their bodies! This is a big complication and is discussed further on. Note that the majority of monsters and beasts do not have this feature — their head is attached to the body, and this parameter is meaningless.0x10: Depth for the body and head when the character is facing east or west.0x14: Depth for the body and head when the character is facing north or south.0x18: Height for equipment on the back of the character.0x20: Width for the character’s head when the character is facing north or south.0x24: Width for the character’s head when the character is facing east or west.0x28: Height for the character’s body. Note that the values aren’t 1:1 to what you get on the screen, i.e. 1.25x the value is going to give you around double the actual height.
There are other rendering parameters present, but I did not find them to be useful for our purposes. Hope this bit of data is useful for any data spelunkers out there. Let’s move on to the next player in this game.
CRenderEntityGroup
By its name, this would appear to be a grouping of rendering data. What kind of grouping? Well, going through a bit of frustration due to not being able to find known character data from the mesh data types, I discovered that each CRenderEntityGroup is responsible for all the renderings pertaining to an individual entity!
This is to be our glue. For the first time ever, I’m not going to worry about linking distantly related character data to chaotic, polymorphing rendering data. Why bother? All we need is some sort of identifier that tells us this particular mesh belongs to a particular entity. That’s all we need on hand in regards to the entity: an arbitrary address that can be found on mesh data that uniquely identifies said entity.
There is one exception to this: we do need to be cognizant as to whether or not said entity is the player character. This is because, usually, the player never morphs. That would be just ridiculous otherwise. Luckily, due to the way things worked out, I didn’t have to worry about that. More on that later.
So, what’re the contents of CRenderEntityGroup? Who cares! We don’t need to know. I definitely did some poking around in it, and ended up going deep down some rabbit holes, at least until I realized the simpler solution. All we need to know is where to find these types on our meshes. For the most part, they’re found at offset 0x140, though not all the time. Differences will be pointed out in the code section.
So, if we want to use this data type as an Abomnification identifier, we need to find some sort of location in code that is polling them. I took a look at member of this data type that was consistently being updated, and checked out what was doing the updating. That led to this code:
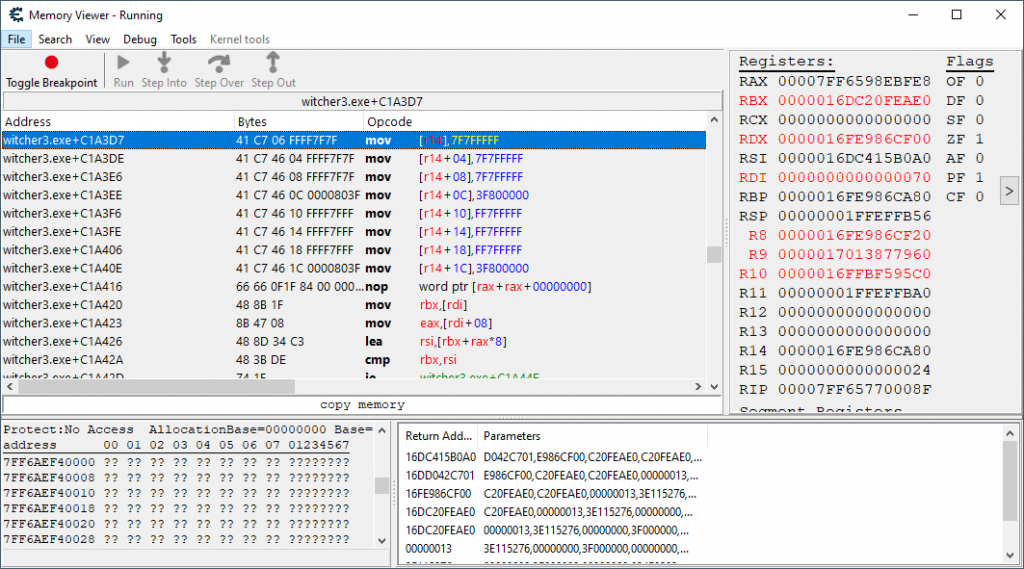
This code is running all the time, and it is consistently doing some property value resets on 0x50 of a CRenderEntityGroup. It was also running at a much lower frequency than the actual rendering code. This is the perfect place for Abomnification system initiation.
We good to start writing some code? Well, no, there’s some pretty critical issues that need some discussing first…
The Floating Head Problem
During a test stream of the Abomnification system, it quickly became apparent the the disconnected nature of head from body was going to be a never ending source of aggravation for me. Things just looked like crap, especially when they had a type of hood on or fancy hair, which would be attached to the body, and not the head. You’d end up getting ladies with their hair ending being a moustache for them, etc.
On top of that, The Witcher 3 has lots of conversations with NPCs where the camera gets all zoomed in on you and them. Any change to the size of the creature in this mode also becomes aggravating. The intention of the Abomnification system, other than providing some absurdity, was really always supposed to be about the utter sheer terror one should experience when being charged by an enemy whose shape and size is unnervingly not the norm.
So I made a big decision in regards to the Omnification of this game: only enemy monsters are going to be Abomnified. They don’t suffer from the floating head problem, and the stream as a whole should be more palatable as normal person to person interactions won’t be in the middle of a bad acid trip.
That being said, I took this opportunity to add a new mode to my channel point redemption list: F**&ed Up Mode. By spending a few points, viewers can compel me to turn it on, which results in everything morphing, player included. It’s actually quite great. And that way it won’t be a constant thing, except for in battle, where it is always very welcome. It is always quite surprising in the ways a non-static enemy size and shape adds challenge to a battle. It’s quite refreshing.
Well, all of that is great, however this is easier said than done. I mean, I frankly would’ve liked to do this in previous games, but it requires us to be able to tell whether or not what’s being rendered is an evil monster. This kind of criteria is something nigh impossible (at least given my skill set at the time) in previous games I’ve done.
Well I figured out a way in The Witcher 3. It is around 99% perfect too. How? Through hacky means, of course! Located at the 0x8 offset of a CRenderProxy_Mesh, it appears a value of 0x8 or lower indicates the rendering is for a monster. At the time of writing, it supports 100% of monsters tested against so far.
As far as false positives go, there is a very, very small group of NPCs that fall under this range as well. So far it’s only been unimportant, non-conversational NPCs, and literally the false positivity rate has been in the order of 1 in 100 or so. We could remove all false positives if we wished, however the spectre/wraith type monsters annoyingly require us to allow up to a 0x8 value. If needed, I’ll do some specific type of filtering on stuff unique to the wraiths.
Either way, it works just about perfectly! I’m very happy. How did I figure all of this out? Hacky means! Trial and error. I don’t know. Detective work!
Writing the Abomnification System Hooks
I’ve gone over where we need our initiation point for the Abomnification system, and I’ve detailed everything we need to know about the custom scaling function. Let’s get to the code we’ll be writing to make The Witcher 3 officially and fully Omnified. Hopefully you will find it to be documented enough to answer any questions.
Remember, you should always refer to the Bad Echo technologies source repository for the latest hacking code.
Abomnification Initiation Point Hook
// Initiates the Abomnification system.
// The function we're hooking into appears to be responsbile for resetting properties on A
// CRenderEntityGroup. It runs much less frequently than the actual rendering functions, so
// it is appropriate to use for Abomnified scale generation progression.
// [r14-50]: CRenderEntityGroup being updated.
define(omnifyAbomnificationHook,"witcher3.exe"+C1A3D7)

assert(omnifyAbomnificationHook,41 C7 06 FF FF 7F 7F)
alloc(initiateAbomnification,$1000,omnifyAbomnificationHook)

registersymbol(omnifyAbomnificationHook)

initiateAbomnification:
  pushf
  // We don't apply the Abomnified scales here, we just generate them for later retrieval.
  // Regardless, we need to backup the registers the Abomnification system uses to hold return values.
  push rax
  push rbx
  push rcx
  // The game maintains a CRenderEntityGroup for all renderings associated with a particular NPC.
  // This makes it a very suitable identifier for the Abomnification system.
  lea rax,[r14-50]
  // Push the identifying address parameter and let's start up the Abomnification!
  push rax
  call executeAbomnification
  pop rcx
  pop rbx
  pop rax
initiateAbomnificationOriginalCode:
  popf
  mov [r14],7F7FFFFF
  jmp initiateAbomnificationReturn

omnifyAbomnificationHook:
  jmp initiateAbomnification
  nop 2
initiateAbomnificationReturn:


// Value change to actual height change is not 1:1, ~1.25x increase in value causes actual height to be ~2x.
abominifyHeightResultUpper:
  dd #160

abominifyHeightResultLower:
  dd #10

abominifyWidthResultUpper:
  dd #400

abominifyDepthResultUpper:
  dd #400

unnaturalSmallX:
  dd (float)1.4

unnaturalBigX:
  dd (float)0.6
That’s the initiation point! Here’s the custom scale application function talked about earlier as well.
Abomnification Scale Application Hook
// Applies Abomnification generated scale multipliers.
// rbx/rcx: The rendering unit, typically CRenderProxy_Mesh.
define(omnifyApplyAbomnificationHook,"witcher3.exe"+CEEFC0)

assert(omnifyApplyAbomnificationHook,41 8B 00 89 41 40)
alloc(applyAbomnification,$1000,omnifyApplyAbomnificationHook)
alloc(headHeightCoefficient,8)
alloc(headHeightShifter,8)
alloc(morphEverything,8)

registersymbol(omnifyApplyAbomnificationHook)
registersymbol(morphEverything)

applyAbomnification:
  pushf
  // We'll need to back up two SSE registers: one for holding the scale multiplier, the other for the particular dimension
  // we're modifying.
  sub rsp,10
  movdqu [rsp],xmm0
  sub rsp,10
  movdqu [rsp],xmm1
  // Backing up the registers used by the Abomnification system to hold return values.
  push rax
  push rbx
  push rcx
  // And an additional one to support dereferencing pointers, as rax and rcx are needed by us for 2-byte value checking and
  // pointer checking respectively.
  push rdx
  // rsi will hold the identifying address for the creature morphing -- in this case, its CRenderEntityGroup.
  push rsi
  // Our primary goal is the association of entity data with what's being rendered.
  // The majority of CRenderProxy_Mesh (or like) instances will point to the CRenderEntityGroup that they belong to here.
  mov rsi,[rbx+140]
  lea rcx,[rsi]
  call checkBadPointer
  cmp rcx,0
  je ensureGroup
  // Some CRenderProxy_Mesh like instances will point to a group here instead.
  mov rsi,[rbx+108]
  lea rcx,[rsi]
  call checkBadPointer
  cmp rcx,0
  jne applyAbomnificationExit
ensureGroup:
  // Ensure that this actually points to a CRenderEntityGroup.
  mov rax,[rsi]
  cmp ax,0xBFE8
  jne applyAbomnificationExit
  cmp [morphEverything],1
  je allowMorphing
  // It seems that this will be set to 0x8 or less for all monster types. We only want to morph enemy monsters.
  mov rax,[rsi+8]
  cmp rax,0x9
  jge applyAbomnificationExit
  jmp allowMorphing
allowMorphing:
  // Push the identifying address parameter and get the Abomnified scales.
  push rsi
  call getAbomnifiedScales
  // Load the Abomnified width.
  movd xmm0,eax
  // Now to apply the Abomnified width. Dimensions in this game are a bit complicated -- we aren't dealing with the
  // the typical 3x4 matrix. The r8 register points to the model data we need to manipulate.
  // [r8]: Width for the body when the character is facing north or south (yes, if character is facing east/west this has 0
  //       effect on the character's model. It has nothing to do with camera position. First time I've seen this kind of thing.
  //       Hell though, ya'll know I'm not a game dev!)
  // [r8+4]: Width for the body when character is facing east or west.
  // [r8+20]: Width for the head when character is facing north or south.
  // [r8+24]: Width for the head when character is facing east or west.
  movss xmm1,[r8]
  mulss xmm1,xmm0
  movss [r8],xmm1
  movss xmm1,[r8+4]
  mulss xmm1,xmm0
  movss [r8+4],xmm1
  movss xmm1,[r8+20]
  mulss xmm1,xmm0
  movss [r8+20],xmm1
  movss xmm1,[r8+24]
  mulss xmm1,xmm0
  movss [r8+24],xmm1
  // Load the Abomnified height.
  movd xmm0,ebx
  // The height dimension has its own complications.
  // [r8+8]: Height and vertical offset for the head. In order to keep in sync with the rest of the body's height, testing has shown
  //         that the value going here needs to be plugged into a function. By charting values required in order to keep the head lined up
  //         with the body, I derived a mathematical function that will more or less keep it in sync.
  //         Note that the position of the head cannot be lowered without shrinking the head, and indeed, in order to continue keeping the
  //         head lined up once the body height value shrinks below 0.8 requires a negative head value to be applied. That means, yes,
  //         short bodies will have upside down heads. It's brilliant!
  //
  //         heightHead = heightBody*3.2 - 2.12
  //         Note that most monsters seem to not have a separate head height value.
  //
  // [r8+18]: Height of equipment on back.
  //
  // [r8+28]: Height for the body. Changes in this value vs changes in actual height on screen is not 1:1. 1.2x here increases height by ~2x
  //          actually, etc.
  mulss xmm0,[headHeightCoefficient]
  subss xmm0,[headHeightShifter]
  movss xmm1,[r8+8]
  mulss xmm1,xmm0
  movss [r8+8],xmm1
  // Reset to Abomnified height for body and equipment height.
  movd xmm0,ebx
  movss xmm1,[r8+28]
  mulss xmm1,xmm0
  movss [r8+28],xmm1
  movss xmm1,[r8+18]
  mulss xmm1,xmm0
  movss [r8+18],xmm1
  // Load the Abomnified depth.
  movd xmm0,ecx
  // For the depth:
  // [r8+10]: Depth for body and head when character is facing east or west.
  // [r8+14]: Depth for body and head when character is facing north or south.
  movss xmm1,[r8+10]
  mulss xmm1,xmm0
  movss [r8+10],xmm1
  movss xmm1,[r8+14]
  mulss xmm1,xmm0
  movss [r8+14],xmm1
  // That's all she wrote.
applyAbomnificationExit:
  pop rsi
  pop rdx
  pop rcx
  pop rbx
  pop rax
  movdqu xmm1,[rsp]
  add rsp,10
  movdqu xmm0,[rsp]
  add rsp,10
applyAbomnificationOriginalCode:
  popf
  mov eax,[r8]
  mov [rcx+40],eax
  jmp applyAbomnificationReturn

omnifyApplyAbomnificationHook:
  jmp applyAbomnification
  nop
applyAbomnificationReturn:


headHeightCoefficient:
  dd (float)3.2

headHeightShifter:
  dd (float)2.12

morphEverything:
  dd 0
That’s it!
Witcher 3 Is Omnified, but More Is To Come
Everything is looking freaking fantastic. I can’t wait to play the official Omnified Witcher 3 playthrough on my stream! It’s going to be a lot of fun! Please check that link out, give me a follow, and hang out! If you enjoy watching someone getting their butt whooped by ridiculous odds, I promise you’ll have fun.
To hang out with the community and say hello, look no further than my Discord server!
In a change in regards to how I’ve been doing things during the last year or so, we’re not going to be hanging up the hacking towel just because the Abomnification system got implemented. I’m going to be continuously working on, developing, and improving hacks on stream with The Witcher 3 in a very leisurely manner. I no longer am going to obsess over streaming just gameplay.
I’m just going to enjoy the process, and you’re welcome to enjoy it with me.
Thanks for your reading, I hope you found it interesting. Have a good one.