
Having the opportunity now to write both a preliminary article and a follow up article on the basic analysis of data structures belonging to Cyberpunk 2077, it’s time to get a bit more crazy with things. That’s right, we’re going to start to make things Omnified by adding in support for my Apocalypse system.
The Apocalypse system completely overhauls how the damage system works in a game, replacing the normal, static application of damage amounts with randomly chosen (and often deadly) effects. For detailed information on what the Apocalypse system is, feel free to check out its design article. If you don’t feel like reading anything, feel free to watch this nice little video instead:
Implementing the Apocalypse system in Cyberpunk 2077 was a bit complicated, mainly in regards to determining whether the player was responsible for damage being done to an NPC, but also due to how Cyberpunk 2077 tracks active vitals (percentages, not discrete, whole values). There were also some other “little” surprises along the way.
We’ll get to all that within the article! To begin, we’ll look for the damage application code where damage is being applied to a current health value.
The Damage Application Code
The Apocalypse system works best when its initiation point is hooked into the game’s damage application code. To learn more about terms like these, so you know exactly what I’m talking about, make sure to check out the relevant section in my article on the Apocalypse system.
To find the damage application code, we first look for the health update code, which is responsible for setting our health to a new value following a damage event. This is easy enough; we just take our reverse engineered health pointer and see what writes to it.
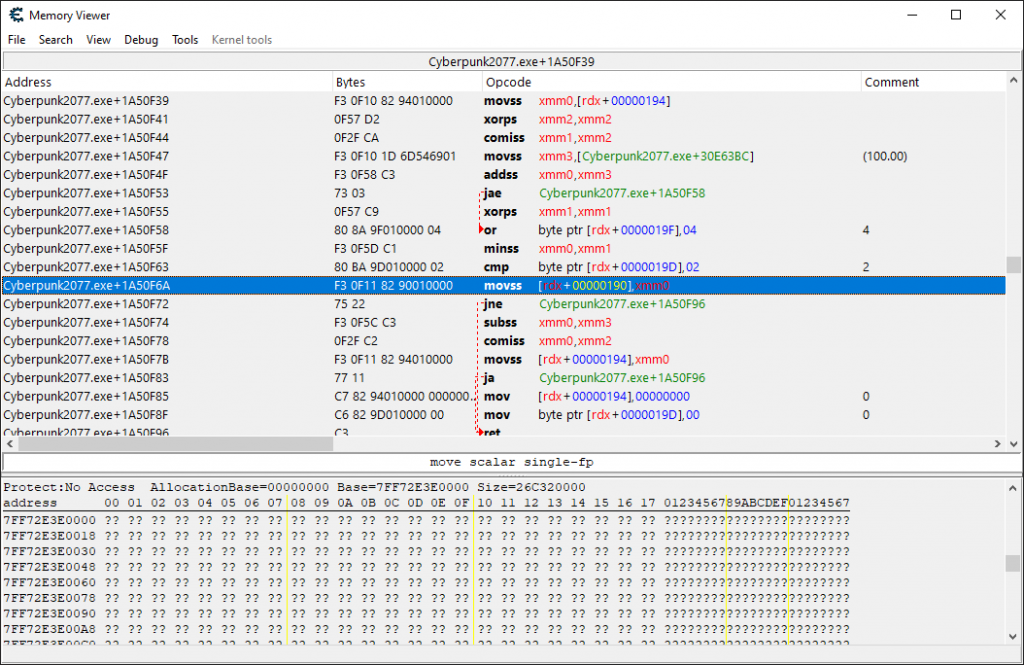
The health can be found at [rdx+190], and the new health value being written to it is sourced from xmm0.
This is actually an area in the code that I refer to as the vitals update code, as it deals with more than just health; indeed, stamina is also covered here, as well as some other statistics. It also deals with both positive changes in health and negative changes alike.
From here, we look for our damage application code. We do this by going up a function or two on the stack, followed by us attempting to do a trace that will capture a health update. This can be difficult sometimes, as parent functions might be calling many different kinds of functions, but in the end, we find our damage application code, pictured below:
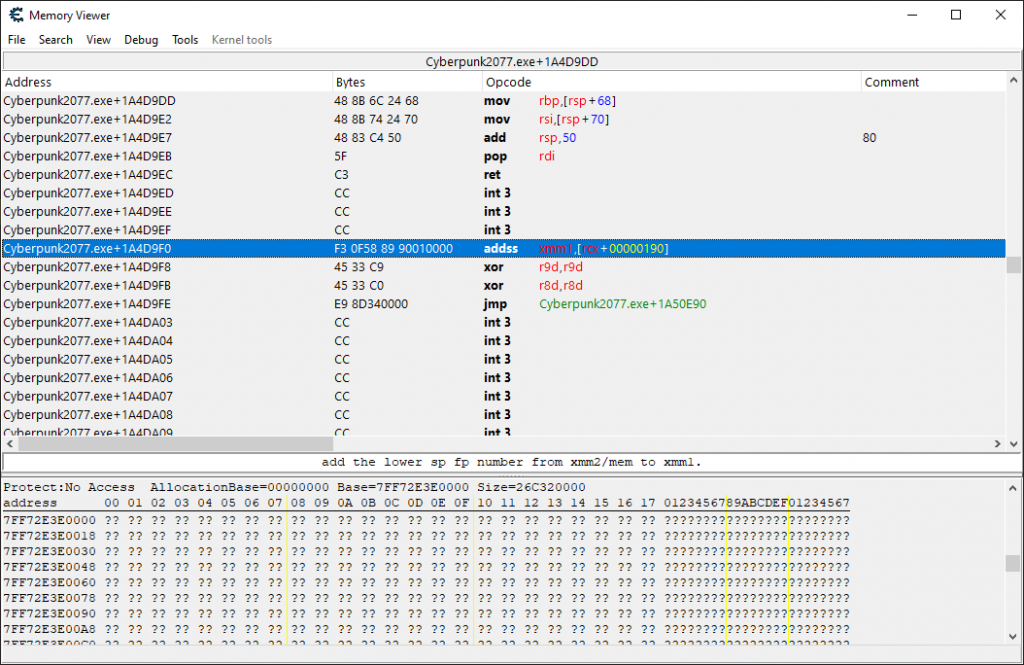
This is a tiny little function that may be called from a number of locations. All those potential complications aside, its purpose is clear: it takes a current health value, found in [rcx+190], and adds it to a damage amount, found in xmm1.
So, we’re good to go right? Sort of. There’s a lot of little issues that started creeping up to the surface in no time once we started to examine this code.
Percentages, Percentages, Percentages!
Although we could have easily guessed what we would end up having to deal with here based on our findings in the first article on hacking Cyberpunk 2077, I was, nonetheless, less than delighted to see what kinds of values were at play here in the damage application code.
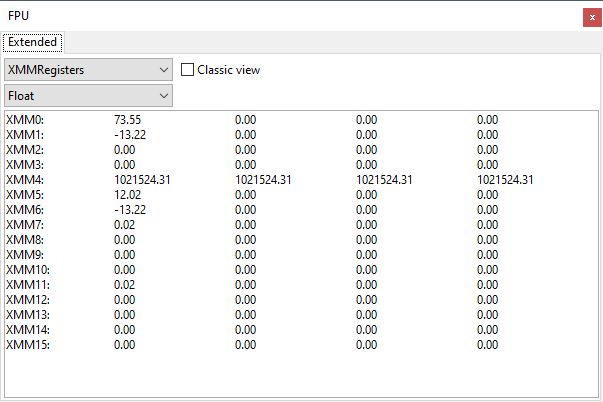
Here is an example of the SSE registers at the time of the damage application code’s execution during my player getting smacked by a vehicle. I had around 158 health prior to getting ran over, and around 130 health after being smacked.
I’m sure I don’t have to tell you, but that is a difference of around 28 health. This differs from the damage amount that was used during the damage application code’s execution, which can be found in the xmm1 register, which we can see was set to -13.22.
That’s because, like everything else dealing with active vital stats in this game, the values at play here are not discrete values, but rather percentages.
Although the Apocalypse system would actually do its job perfectly well working with just percentages (given that multiplying a percentage by an extra amount is the same as multiplying a discrete value by an extra amount, of course), the Apocalypse system is also responsible for tracking the various damage statistics for both the player and enemies.
In order for the damage to be reported on accurately, these percentages must be converted to discrete values before feeding them into the Apocalypse system. And then, of course, the Apocalypse results must be converted back into percentages (if we don’t want the game to blow up)! Annoying, but doable.
One other little detail that we must take into account, is the sign of the damage amount. Cyberpunk 2077 works with damage amounts that are in the negative. While this seems like perhaps the logical way to deal with damage amounts, it is actually rather uncommon to do so, at least based on what I’ve seen in the other games that I’ve hacked. For the most part, damage amounts are treated positive values that get subtracted from the health.
So, we’ll also need to convert the damage amounts into positive values before calling the Apocalypse system, and then convert them back to negative values after calling the Apocalypse system. Well, that’s that then.
Assuming we take care of all of that, are we then ready to hook up the Apocalypse system? Not quite. One very important requirement of the Apocalypse system proved to be a difficult one to satisfy with Cyberpunk 2077, and while it typically is always a hard requirement to satisfy with games, it took me several streams to get a working solution for this one.
Detecting Damage Inflicted by the Player
The most important decision we must make when calling the Apocalypse system is whether to call into the Player Apocalypse or the Enemy Apocalypse. If the player is getting damaged, then we hit up the former, and if the enemy is getting damaged, then we hit up the latter, but only if the player is the one damaging the enemy.
This is very important, especially with the advent of Vision. The Enemy Apocalypse tracks the damage we do to enemies, and we really don’t want random numbers popping up from a teammate instead of us shooting an enemy. If the data isn’t accurate, there’s no point in displaying it pronouncedly on the screen.
It’s very simple to tell whether the player is being damaged as opposed to an enemy being damaged, assuming the structure containing the health value is available while the damage application code is being executed. In the case of Cyberpunk 2077, it most certainly is, and it can be found by looking at what the rcx register is pointing to.
Figuring out the source of the damage, however, is another story altogether. This is very low-level code, and there is really no need for this code to have any kind of awareness at all as to who is actually responsible for causing the damage. Remember, all it is doing is just taking a damage value and applying a current health value to said value. This is a simple arithmetic operation.
So, how do we go about figuring out a way to tell whether the player is the one doing the damage? There are several strategies I tend to employ, which I’ll go over now.
Damage Source Detection via CPU Register Patterns
I first take a look at the values of the various CPU registers at the time of the damage application code’s execution. It’s highly unlikely, due to the reasons just described, that we’re going to find any kind of player data being pointed to by one of the main CPU registers, but there may be certain values that are reflected only when the player is doing the damage.
For example, the r12 register might be 0xFFFFFFFF except for instances where the player is the one responsible for doing the damage.
This is always a long shot, but it is definitely worth checking out, since the alternatives get much trickier. Unfortunately, with Cyberpunk 2077, there were no unique CPU register states observed when the player was damaging an NPC versus another NPC damaging said NPC.
Damage Source Detection via the Stack
If the above fails, then I turn to looking at what’s being stored on the stack. This requires taking various stack dumps during different and strategically chosen gameplay situations and comparing them. Doing this, we may find something on the stack that we can reliably discern the damage source information from.
If I wasn’t able to detect the damage source via the previous method, then this usually did the trick for me. It’s how I managed to detect the damage source for the very first time when Omnifying Middle-earth: Shadow of War.
For Cyberpunk 2077, I took two stack dumps (at the time of the damage application code’s execution) while the player shot the same enemy. Then, I took another stack dump while one of my teammates was shooting the same enemy. I then loaded all of these dumps into a difference tool, and looked for a way to tell when the player was doing the damage.
I didn’t have very much player data mapped out at this time, but that wasn’t important. All I needed to do was find all of the entries in the stack pointing to the same place in memory between the two stack dumps where I was doing the damage, and then see if the stack dump taken while my teammate was doing the damage had the same stack entry pointing to a different place in memory.
If I could find something like that, then that would tell me that I most likely found player-identifiable data that I could use to determine whether or not the player was the source of damage.
Sadly, I literally found nothing. There were no two places of matching memory found on the two stack dumps where I was doing the damage that didn’t also match up to the stack dump where my teammate was doing the damage. Ouch!
This technique had served as my “last resort” for several games, and it had always pulled through. Well, I had to figure out a new way to do it with Cyberpunk 2077, and it took a number of tries until I finally figured it out.
Various Unsuccessful MacGuyverisms
I was pretty much out of ideas at this point. I simply had no idea as to how I could tell when it was the player doing the damage to an NPC. So, I instead tried to make do with several MacGuyverisms, or in other words, semi-crackpot improvised ideas, to accomplish the same thing.
I thought that maybe I could detect the player as the damage source if I raised a flag when shooting a bullet and then checking for this flag when an NPC was being processed by the damage application code. Obviously, this would invite a lot of inaccuracies, as just because I fired a bullet didn’t mean it actually was the bullet that hit a particular NPC.
So, to make it a little tighter, I wrote some code that would reset the flag if enough time had passed between me firing my gun and the enemy getting hit. Clearly, it should not take long for a bullet to hit an enemy after it was shot out. Well, that kind of worked, however it would prove to be incredibly inaccurate during large-scale gun fights.
Don’t forget that I also had to account for melee attacks, so I also had to add in and maintain some code that would detect whether I was swinging a weapon based on the amount of stamina that was being consumed.
That detail aside, I was getting a lot of false positives, so I then added code that would reset my “attack” flag if another NPC fired their gun. This got rid of all of the false positives, however it basically resulted in a lot of my attacks not getting tracked either.
While I could respect my own gumption in trying to get some of these ideas to work, in the end they really weren’t going to represent any kind of viable solution; so, it was back to the drawing board to once again figure out a proper way to figure out the damage source.
Luckily, amazingly in fact, I actually managed to do it, and in the process I, added a new “technique” to my tool belt.
Damage Source Detection via Working Memory Analysis
Working memory is a term I use to refer to memory containing a wide variety of data that is incredibly temporary in nature. Addresses pointing to working memory are easily identifiable by how low they are in the process’s address space.
For example, a structure existing at 0x424FEDA0 is very likely to be temporary working memory, whereas a structure existing at 0x219686DBCD8 is much more likely to be more permanent data tasked with the storage of something like NPC creature data.
It is very difficult to work with working memory, as that address space is used for literally everything, and attempting to monitor it to see what code is reading from and writing to it will result in so many matches that there is a very high chance that you will crash the process.
So, I tend to avoid ever dealing with such memory. But, as I would end up learning with Cyberpunk 2077, I need to look at it more often!
All of the other kinds of memory analysis I had done up to this point had been “single level”, in a manner of speaking. If I start looking at the contents of working memory when trying to find patterns, then all of the sudden we have multiple levels of data we can look through and compare.
And that ended up working for me here — it’s really something that is going to require some additional tooling, tooling I may have to create, in order to properly exploit in the future.
So, what did I exactly figure out? Let’s take a look at the damage application code once again.
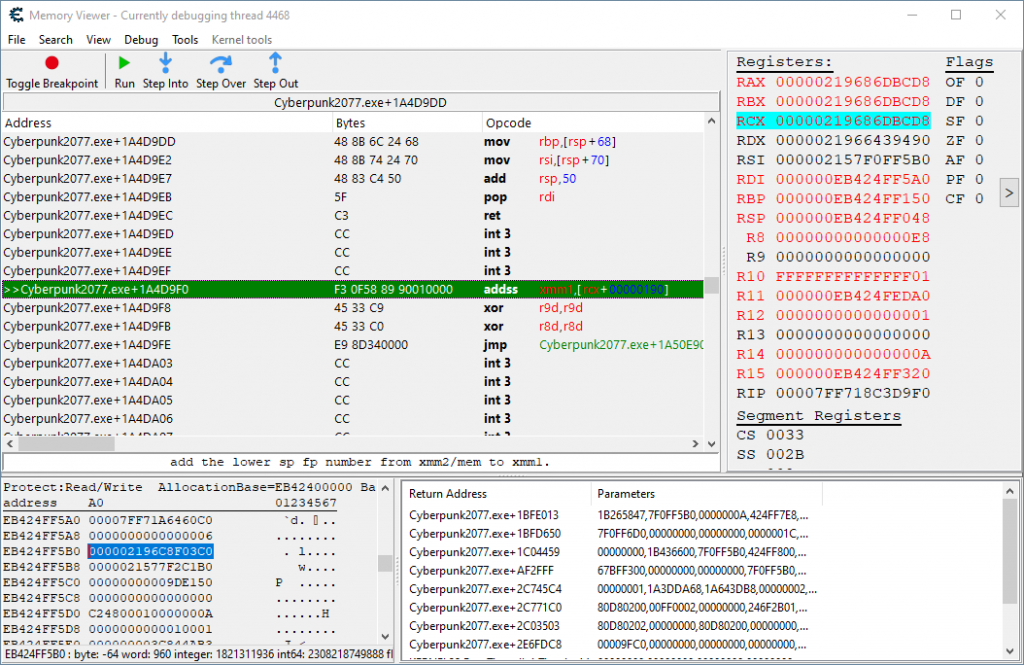
Here is a snapshot of the damage application code’s execution while I was shooting some innocent bystander. If you look at the rdi, rbp, rsp, r11, and r15 registers, you can tell that they all point to temporary, working memory. Something I easily glanced over before.
After consulting some traces of nearby code to see what the game was reading, I randomly decided to check out what was located in the temporary working memory pointed to by rdi. If you look at the memory browser in the lower left portion of the image above, you’ll see that it is displaying the memory being pointed to by that very register.
The highlighted value, 0x2196C8F03C0, stuck out to me. It looked like potentially character-specific data. Could it be something that is uniquely tied to the player and also something we could use to determine if we’re the ones doing the damage?
I decided to roll the dice and see if it could work, and I quickly noticed that this value was always the same whenever I was doing the damage, and that it would always be a different value if someone else was doing the damage. Yes!! We found it.
Finding the Player Identifying Attack Structure
What is this mystery structure that is apparently our signal that we are the ones responsible for doing some damage? Who knows! It is whatever we say it is, and I labeled it our player identifying attack structure.
In order for us to make any use of it, we would need to be able to procure the address to this attack structure ahead of time. So, I look for code accessing this address, and luckily hit gold:

Because it is being polled for constantly, we can be sure that we’ll have it before we make any attacks on an enemy. All we needed to do was hook in here and create a pointer to this address. The only thing left we would need to check for before doing the hook, was whether we had to filter it out from anything else being accessed by this code.
And, amazingly enough, there wasn’t anything! This code only accesses our player identifying attack structure! This is not the case with most things with this game, and I was overjoyed.
Player Identifying Attack Structure Hook
// Gets the player's identifying attack structure.
// UNIQUE AOB: 48 8B 01 FF 90 20 01 00 00 48 8D 4B
define(omniPlayerAttackHook,"Cyberpunk2077.exe"+2DFB970)

assert(omniPlayerAttackHook,48 8B 01 FF 90 20 01 00 00)
alloc(getPlayerAttack,$1000,omniPlayerAttackHook)
alloc(playerAttack,8)

registersymbol(omniPlayerAttackHook)
registersymbol(playerAttack)

getPlayerAttack:
    push rax
    mov rax,playerAttack
    mov [rax],rcx
    pop rax
getPlayerAttackOriginalCode:
    mov rax,[rcx]
    call qword ptr [rax+00000120]
    jmp getPlayerAttackReturn

omniPlayerAttackHook:
    jmp getPlayerAttack
    nop 4
getPlayerAttackReturn:
Hell yes! We have everything we need in order to write a stable Apocalypse hook.
Writing the Apocalypse Hook
We now have everything we need in order to write the Apocalypse hook and make the game officially Omnified. Before I show that code, however, allow me to cover one more point of interest, lest the reader be confused in regards to a particular portion of the code.
The Carpocalypse
Vehicles are way too durable in this game. I wanted the character’s motorcycle to explode upon contact with anything. I also had plans on writing a game-specific Omnified hack where an “enemy hacker” would randomly hack the speed of the vehicle the player was driving, causing it to speed up incredibly fast at the drop of a hat.
This then, would of course cause panic and hopefully a giant explosion. Of course, vehicles are far too durable for that. So, in order to correct this, I decided to add something I termed the Carpocalypse, which basically causes all vehicles in the game to take 50x more damage than normal.
Yes, this may make some things easier in the game for me, assuming I have to fight any enemy vehicles. But, let’s be real, what it really is going to do is get my ass blown up a lot.
In order to apply a special damage modifier to vehicles, I needed to be able to distinguish between a vehicle’s health structure and a non-vehicle’s health structure. After doing many comparisons between humanoid and vehicle NPC instances, I found that the key was to look at the 0x170 offset in the target’s active health structure.
If the value at this offset is 0x01000001, then it is a vehicle. Otherwise, it isn’t. Easy!
Code for the “enemy hacking the player’s vehicle speed” might be covered in a future article. Stay tuned!
The Apocalypse Initiation Hook
For the most up to date code, always refer to the official Bad Echo technologies source code repository, and in particular, the code for Omnified Cyberpunk 2077. Changes to code I publish in my articles are always subject to change.
Here’s the code that completely replaces the damage system in Cyberpunk 2077 with something that is truly amazing and much more fun! You should find the code very well documented, which will hopefully answer any questions you might have about the code itself. No need for me to write anymore!
// Initiates the Apocalypse system.
// xmm1: Damage percentage.
// [rcx+190]: Working health percentage.
// UNIQUE AOB: F3 0F 58 89 90 01 00 00 45
define(omnifyApocalypseHook,"Cyberpunk2077.exe"+1A4D9F0)

assert(omnifyApocalypseHook,F3 0F 58 89 90 01 00 00)
alloc(initiateApocalypse,$1000,omnifyApocalypseHook)
alloc(vehicleDamageX,8)

registersymbol(omnifyApocalypseHook)
registersymbol(vehicleDamageX)

initiateApocalypse:
    pushf
    // Ensure the required player data structures are initialized.
    push rax
    mov rax,playerHealth
    cmp [rax],0
    pop rax
    je initiateApocalypseOriginalCode
    push rax
    mov rax,playerLocation
    cmp [rax],0
    pop rax
    je initiateApocalypseOriginalCode
    // Changes to stamina are also tallied here. We only care about health.
    push rax
    mov rax,playerStamina
    cmp [rax],rcx
    pop rax
    je initiateApocalypseOriginalCode
    sub rsp,10
    movdqu [rsp],xmm0
    sub rsp,10
    movdqu [rsp],xmm2
    push rax
    push rbx
    // Convert the damage percentage into a discrete value.
    mov rax,percentageDivisor
    movss xmm2,xmm1
    divss xmm2,[rax]
    mulss xmm2,[rcx+188]
    mov rax,negativeOne
    mulss xmm2,[rax]
    // Convert the working health percentage into a discrete value.
    movss xmm0,[rcx+190]
    mov rax, percentageDivisor
    divss xmm0,[rax]
    // Multiply the percentage by the maximum health.
    mulss xmm0,[rcx+188]
    // Check if the player is being damaged.
    mov rax,playerHealth
    cmp [rax],rcx
    je initiatePlayerApocalypse
    // The temporary working memory register at rdi points to an identifying
    // attack source.
    mov rax,[rdi+10]
    mov rbx,playerAttack
    cmp [rbx],rax
    jne initiateApocalypseCleanup
    // The value found at this location in the health structure will be zero for vehicles.
    mov eax,[rcx+18C]
    cmp eax,0
    jne initiateEnemyApocalypse
    mov rax,[rcx+170]
    cmp eax,0x01000001
    jne initiateEnemyApocalypse
    // We're damaging a vehicle. Let the Carpocalypse commence.
    mulss xmm2,[vehicleDamageX]
    movd eax,xmm2
    movd ebx,xmm0
    jmp initiateApocalypseUpdateDamage
initiatePlayerApocalypse:
    // Load the damage amount parameter.
    sub rsp,8
    movd [rsp],xmm2
    // Load the working health amount parameter.
    sub rsp,8
    movd [rsp],xmm0
    // Load the maximum health amount parameter.
    push [rcx+188]
    // Align the player's location structure at the x-coordinate.
    mov rax,playerLocation
    mov rbx,[rax]
    lea rax,[rbx+210]
    push rax
    call executePlayerApocalypse
    jmp initiateApocalypseUpdateDamage
initiateEnemyApocalypse:
    // Load the damage amount parameter.
    sub rsp,8
    movd [rsp],xmm2
    // Load the working health amount parameter.
    sub rsp,8
    movd [rsp],xmm0
    call executeEnemyApocalypse
initiateApocalypseUpdateDamage:
    movd xmm1,eax
    divss xmm1,[rcx+188]
    mov rax,percentageDivisor
    mulss xmm1,[rax]
    mov rax,negativeOne
    mulss xmm1,[rax]
    movd xmm0,ebx
    divss xmm0,[rcx+188]
    mov rax,percentageDivisor
    mulss xmm0,[rax]
    movss [rcx+190],xmm0
initiateApocalypseCleanup:
    pop rbx
    pop rax
    movdqu xmm2,[rsp]
    add rsp,10
    movdqu xmm0,[rsp]
    add rsp,10
initiateApocalypseOriginalCode:
    popf
    addss xmm1,[rcx+00000190]
    jmp initiateApocalypseReturn

omnifyApocalypseHook:
    jmp initiateApocalypse
    nop 3
initiateApocalypseReturn:


damageThreshold:
    dd (float)0.2

coordinatesAreDoubles:
    dd 1

negativeVerticalDisplacementEnabled:
    dd 0

yIsVertical:
    dd 0

teleportitisDisplacementX:
    dd (float)0.5

verticalTeleportitisDisplacementX:
    dd (float)3.25

vehicleDamageX:
    dd (float)50.0
Stabilizing Teleportitis
Everything is almost working perfectly, except for one little thing: the teleportitis. This is the effect that will teleport the player to a random location upon getting hit.
The physics in Cyberpunk 2077 are a bit touchy, and suddenly setting our player’s coordinates to new values would often result in the player getting slingshot to a very distant location.
The key to stabilizing these teleports was to skip several movement frames upon a teleportitis occurring, this would then result in the player’s location changing but without any of the added inertia that would normally have been incurred from said change.
This meant I had to hook into the location update code where my player’s coordinates are being updated to new values with the following code:
Player Location Update Hook
// Hooks into the player's location update function, allowing us to prevent the
// player physics system from interfering with teleportitis effects.
// Current values for x and y are located at [rsi+208].
// Updated values for x and y are located at [r15+08].
// Current values for z are located at [rsi+218].
// Updated values for z are located at [r15+18].
// UNIQUE AOB: 41 0F 10 47 08
define(omnifyPlayerLocationUpdateHook,"PhysX3CharacterKinematic_x64.dll"+7B8D)

assert(omnifyPlayerLocationUpdateHook,41 0F 10 47 08)
alloc(playerLocationUpdate,$1000,omnifyPlayerLocationUpdateHook)
alloc(movementFramesToSkip,8)

registersymbol(omnifyPlayerLocationUpdateHook)

playerLocationUpdate:
    pushf
    sub rsp,10
    movdqu [rsp],xmm0
    push rax
    mov rax,movementFramesToSkip
    cmp [rax],0
    pop rax
    jg skipMovementFrame
    jmp checkForTeleported
skipMovementFrame:
    push rax
    mov rax,movementFramesToSkip
    dec [rax]
    pop rax
    movupd xmm0,[rsi+208]
    movupd [r15+08],xmm0
    movupd xmm0,[rsi+218]
    movupd [r15+18],xmm0
    jmp playerLocationUpdateCleanup
checkForTeleported:
    push rax
    mov rax,teleported
    cmp [rax],1
    pop rax
    jne playerLocationUpdateCleanup
    push rax
    mov rax,teleported
    mov [rax],0
    mov rax,movementFramesToSkip
    mov [rax],2
    pop rax
    jmp skipMovementFrame
playerLocationUpdateCleanup:
    movdqu xmm0,[rsp]
    add rsp,10
playerLocationUpdateOriginalCode:
    popf
    movups xmm0,[r15+08]
    jmp playerLocationUpdateReturn

omnifyPlayerLocationUpdateHook:
    jmp playerLocationUpdate
playerLocationUpdateReturn:
After this change, everything was working peachy.
This Game Is Now Omnified
Omnified Cyberpunk 2077 with the Apocalypse system is simply a treat. I’m having a ton of fun playing it. In the end, despite the problems encountered, it was actually much easier to implement than the Apocalypse system in The Witcher 3.
Remember, to catch the Omnified gameplay action live, as well as maybe me doing some live hacks, you’ll have to tune in to my official Twitch stream at https://twitch.tv/omni!
The best way to get notifications as to when I’m going live is to join my official Discord server at https://discord.gg/omni.
Thanks for reading; hope you learned something! Until next time.