After creating some fancy new Azure DevOps pipelines at work, I decided the automated workflow used for my personal projects deserved some much-needed love.
I’ve previously written a bit on the workflow used in Bad Echo software repositories, including how things were versioned, built, and deployed. I’ve made numerous improvements since.
Because I’ve written about my GitHub automation in the past, I figured I’d supply an update with some explanations readers may find helpful when implementing their own processes.
CI/CD Pipeline Overview
The new CI/CD pipeline used in Bad Echo repositories comprises the following components:
- CI/CD workflow (
ci.yml) which, when a push to the repo is made, will build all projects, run unit tests, and then deploy packages (versioned as pre-releases, by default) to NuGet - Release workflow (
release.yml) that, when executed manually, will generate a new stable release of the code - Version file (
version.json) where versioning information is recorded and sourced from during compilation - Build submodule (
/build/), which houses various scripts used by workflows across numerous repositories
This may sound a lot like what was detailed in the previous article. However, many significant improvements have been made, making it a much more sound process in the end.
Let’s start by looking at versioning.
Versioning: More Hands-Off
Version information is recorded in a version file, the structure of which has stayed the same since I wrote about it last.
version.json
{
  "majorVersion": 1,
  "minorVersion": 0,
  "patchVersion": 12,
  "prereleaseId": "alpha"
}
Bad Echo projects use a versioning scheme that follows the semantic versioning specification, as stated in the previous article.
The version components in this file are piped into the MSBuild process as properties that get applied to other version-related properties, shaping the versioning metadata that gets baked into our compiled assemblies. This relies on the use of a Directory.Build.props file that was described in the last article.
The build number applied to pre-release versions is determined by the number of commits pushed since the version file was last changed. Whenever a version component in the file is bumped, the builder number is reset.
One aspect of the previously implemented pipeline that I didn’t like was having to remember to manually update a version component in this file after doing a stable release. The process felt clunky to me and prone to error.
With the new pipeline, the automated workflow increments the version components for us, making me a happy camper.
Now, on to the star of the show: the CI workflow.
CI/CD Workflow
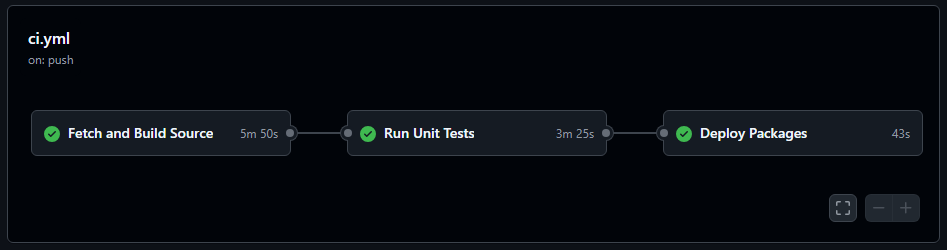
The CI/CD workflow (/.github/workflows/ci.yml) is integral to the entire process. It’s triggered automatically whenever a push is made to the repo and is also executed by other workflows whenever code needs to be built, tested, and deployed.
The workflow I use in Bad Echo repos has undergone quite a metamorphosis since the last article, with many improvements and changes added that we’ll look at now.
More Jobs: Good for More than Just the Economy
Previously, the workflow consisted of only a single job. One change I wanted to make was the segmenting of all major phases of the process into individual jobs.
There are several organizational and functional benefits to this approach. A big one is the ability to re-run failed jobs independently from the others. This is something that could be useful when dealing with strange, intermittent unit test failures, but I primarily wanted it for the deployment phase.
Sometimes deployments fail, typically due to an expired API key, and I hated having to go through the build and test phases all over again whenever that happened.
Some particular issues commonly arise, however, when dealing with multiple jobs. We’ll look at what those are as they come up while we review each part of the workflow.
Overview of the Workflow
The following is an example of a CI/CD workflow template applied to a new repository. You can read about what workflow templates are here.
Everything is good to go after applying the template for most of my repositories. If specialized logic is required, it can be added after using the template. I’ll provide a link to such an example later in the article and the original template.
1. You’re Triggering Me, Man!
Workflows usually begin with trigger definitions, which specify when the workflow should run. Our CI/CD workflow has several.
ci.yml – Triggers
name: CI/CD

on:
  push:
    branches:
      - master
    paths-ignore:
      - '.github/workflows/**'
      - '!.github/workflows/ci.yml'
  pull_request:
    branches:
      - master
  workflow_call:
    inputs:
      release-build:
        required: true
        type: boolean
        default: false
      skip-tests:
        required: false
        type: boolean
        default: false
    secrets:
      REPO_TOKEN:
        required: true
      NUGET_API_KEY:
        required: true
We see a traditional push trigger, which will cause this workflow to run whenever changes are pushed to the repo. This is a rather essential characteristic of a continuous integration component.
One of my recent changes to the workflow was the addition of a workflow_call trigger, which turns this workflow into a reusable one.
I didn’t like the duplication of build/deploy code across my other workflows, so now we can have them all call into this one.
When the release-build input is true, the assemblies and packages will be versioned as new stable releases rather than pre-releases. The workflow defaults to building pre-release assemblies when triggered by a push.
We’ll see how this workflow gets called by another when we look at the release workflow.
2. Build Job
Our first job fetches the source and compiles it.
ci.yml – Build
build:
  name: Fetch and Build Source
  runs-on: windows-2022
  outputs:
    build-submodule-sha: ${{ steps.submodule-status.outputs.BUILD_SUBMODULE_SHA }}
  steps:
  - name: Checkout
    uses: actions/checkout@v4
    with:
      submodules: recursive
      fetch-depth: 0
  - name: Get Build Submodule Hash
    id: submodule-status
    run: Write-Output "BUILD_SUBMODULE_SHA=$($(-split $(git submodule status build))[0])" >> $Env:GITHUB_OUTPUT
  - name: Setup .NET
    uses: actions/setup-dotnet@v4
    with:
      dotnet-version: 9.0.x
  - name: Add MSBuild to PATH
    uses: microsoft/setup-msbuild@v2
  - name: Build
    run: .\build\Invoke-Build.ps1 -ReleaseBuild:$([System.Convert]::ToBoolean($Env:RELEASE_BUILD)) -PackageConfiguration:$Env:PACKAGE_CONFIGURATION
    env:
      RELEASE_BUILD: ${{ inputs.release-build != '' && inputs.release-build || 'false' }}
      PACKAGE_CONFIGURATION: ${{ env.PACKAGE_CONFIGURATION }}
    # Store our compiled assets for subsequent jobs.
  - name: Upload Build Artifacts
    uses: actions/upload-artifact@v4
    with:
      name: binaries
      path: bin/rel/
  - name: Upload Package Artifacts
    uses: actions/upload-artifact@v4
    with:
      name: packages
      path: artifacts/
We start by following the standard procedure of cloning the repo and installing .NET. We also record the commit hash for the build submodule as an output, so jobs down the line can grab any needed deployment scripts.
The setup-dotnet action does not add MSBuild to our PATH, which some of my projects require due to being incompatible with the dotnet tool (i.e. unmanaged code), so we follow up with the setup-msbuild action.
The most important bit is the build script invocation, which actually conducts the code compilation. I’ll include a link to the script later in the article, but let’s first look at how we’re invoking it.
The following environment variables are passed to it:
env:
  RELEASE_BUILD: ${{ inputs.release-build != '' && inputs.release-build || 'false' }}
  PACKAGE_CONFIGURATION: ${{ env.PACKAGE_CONFIGURATION }}
If the workflow is invoked due to a push, it won’t have any inputs, so a conditional expression like the one shown above is needed. By default, CI runs produce pre-release assemblies. We don’t want every little commit to result in a stable release.
We wrap up the build job by uploading all of our compiled assets as artifacts. This is required because subsequent jobs will be running in their own hosted virtual environments.
3. Test Job
Now that we got our stuff built, it’s time to test it!
ci.yml – Test
test:
  name: Run Unit Tests
  needs: build
  if: inputs.skip-tests != true
  runs-on: windows-2022
  steps:
  - name: Setup .NET
    uses: actions/setup-dotnet@v4
    with:
      dotnet-version: 9.0.x
  - name: Add VSTest to PATH
    uses: darenm/Setup-VSTest@v1.3
  - name: Download Build Artifacts
    uses: actions/download-artifact@v4
    with:
      name: binaries
      path: bin/rel/
  - name: Execute Test Runner
    run: |
        Get-ChildItem bin\rel\*.Tests.dll | `
        ForEach-Object {vstest.console /Logger:trx`;LogFileName="$($_.BaseName).trx" /ResultsDirectory:testResults $_.FullName; if ($LASTEXITCODE -eq 1) {$failWhenDone = $true} }; `
        if ($failWhenDone -eq $true) { exit 1 }/Logger:trx`;LogFileName="$($_.BaseName).trx" /ResultsDirectory:testResults $_.FullName}
  - name: Upload Test Artifacts
    uses: actions/upload-artifact@v4
    with:
      name: test-results
      path: testResults/
As was just mentioned, each job is hosted by an isolated runner. So, we start with a blank slate here and have to reinitialize the environment as needed.
We don’t need to do a full checkout again; we just need to reinitialize .NET and download our build artifacts so that we can test them. We also use the darenm/Setup-VSTest action in order to add vstest.console to our PATH, allowing for easy test execution.
Once testing is completed, we upload our test results as an artifact. This would also be a great place to add any desired custom actions that generate reports for the test results.
4. Deploy Job
The last job for our workflow deploys the previously compiled packages to NuGet for all the world to enjoy.
ci.yml – Deploy
deploy:
  name: Deploy Packages
  needs: [build, test]
  if: always()
  runs-on: windows-2022
  steps:
  - name: Check Previous Jobs' Results
    if: needs.build.result != 'success' || (needs.test.result != 'success' && inputs.skip-tests != true)
    run: exit 1
  - name: Checkout Build Submodule
    uses: actions/checkout@v4
    with:
      repository: BadEcho/build
      ref: ${{ needs.build.outputs.build-submodule-sha }}
      path: build
  - name: Setup .NET
    uses: actions/setup-dotnet@v4
    with:
      dotnet-version: 9.0.x
  - name: Download Package Artifacts
    uses: actions/download-artifact@v4
    with:
      name: packages
      path: artifacts/
  - name: Push to NuGet
    run: .\build\Publish-Packages.ps1 ${{ secrets.NUGET_API_KEY }}
There are a few bits here that may come off as odd at first, most notably the needs and if conditional expression.
needs: [build, test]
if: always()
runs-on: windows-2022
steps:
- name: Check Previous Jobs' Results
  if: needs.build.result != 'success' || (needs.test.result != 'success' && inputs.skip-tests != true)
  run: exit 1
The needs key defines the dependencies for this job. Both build and test must have ran successfully in order for this job to run. This rather reasonable configuration is then followed by an if conditional that causes the job to always run, even if build and test failed or didn’t run.
The reason for this configuration is so that we can support the skip-tests input. When set to true, this input causes the test job to be skipped (which I prefer when creating a stable release, something you’d only do after an immediately preceding CI workflow run is completed successfully).
So, the above configuration is needed if we have a job with “optional” dependencies. However, we still don’t want the deploy job to run if either the build or test jobs are canceled or failed, so we have a step that will fail the run in such an event.
After determining whether or not the job should run, we set up .NET once again (we need to use the dotnet-nuget tool), grab our package artifacts and our build scripts, and then execute a package push script.
We could simplify this a bit by using inline PowerShell (which would obviate the need to retrieve our build scripts in this job’s environment), but I prefer to limit inline scripts to one- or two-liners.
Release Workflow
The CI/CD workflow we discussed will automatically generate pre-release builds in response to changes being pushed to our repo.
There comes a time, now and again, when we might have a winner in terms of stability and functionality. And that’s when we know it’s time for a stable release.
To create a stable release, we manually execute a workflow that’s dedicated to that task.
Deduplicating Redundancies
One thing I didn’t like about the previous iteration of my release workflow was how it was essentially a copy-paste of the CI/CD workflow with some minor modifications.
To address the redundancy issue, the CI/CD workflow was turned into a reusable workflow, which the release workflow can now call to execute the build/deployment logic it needs. After it’s done with that, it can do all the other “release-y” stuff it needs to do.
This leaves us with a much more condensed workflow.
Overview of the Workflow
The following is, once again, an example of a release workflow applied to a new repository. Unlike the CI/CD workflow, the likelihood of needing to add any specialized logic has been low in my experience.
1. You’re Still Triggering Me!
Unlike the previous workflow, the release workflow only executes when done so manually by a human (or any other creature of similar intelligence).
release.yml – Triggers
name: Create Stable Release

on:
  workflow_dispatch:
    inputs:
      component-to-increment:
        description: Version Component to Increment
        required: true
        type: choice
        options:
        - Major
        - Minor
        - Patch
The workflow_dispatch trigger allows this workflow to be ran manually. The input asks the developer to specify the version component they want bumped after the stable release is made.
A stable release is meant to be the definitive release for a particular version, so our version will need a bumpin’ after the release is made.
2. Build Job
The build job is where we call into our reusable CI/CD workflow.
release.yml – Build
build:
  name: Execute Build Workflow
  uses: ./.github/workflows/ci.yml
  with:
    release-build: true
    skip-tests: true
  secrets:
    REPO_TOKEN: ${{ secrets.REPO_TOKEN }}
    NUGET_API_KEY: ${{ secrets.NUGET_API_KEY }}
We indicate via the release-build input that we want a stable release, and we skip the tests because we should only be executing this workflow if the most recent CI/CD run passed.
It may be prudent to add a check that ensures that the most recent CI/CD run actually did pass. I have not done that here; maybe I’ll blurb about it if I do in the future.
Note that we must provide the reusable workflow with all the secrets it might require at invocation, even if it lives in the same repository as the caller (and, therefore, would normally have access to those same secrets).
3. Create Release Job
If the build job passed, then a stable release has been published. So, we create a new Git tag for the version, commit that, and then bump our version.
release.yml – Create Release
create-release:
  name: Create Release
  needs: build
  runs-on: windows-2022
  steps:
  - name: Checkout
    uses: actions/checkout@v4
    with:
      submodules: true
      fetch-depth: 0
  - name: Setup Git User
    run: git config --global user.email "chamber@badecho.com"; git config --global user.name "Echo Chamber"
  - name: Create Release Tag
    run: .\build\New-ReleaseTag.ps1 "${{ env.PRODUCT_NAME }}"
  - name: Bump Version
    run: .\build\Bump-Version.ps1 ${{ github.event.inputs.component-to-increment }}
Pretty straight forward. Links to the referenced scripts are provided below.
This would also be a great place to generate an actual “Release” hosted on GitHub — something I’ll get around to doing myself later.
Links to Complete Examples
You can find templates for the workflows discussed in this article in my organizational repository:
The various build scripts referenced by the workflows can be found in the Bad Echo build repository.
Have a good one!
Update: Release Validation
Since writing this article, I was driven to add validation to the release workflow that ensured the commit you’re creating a stable release for had a successful CI/CD run. I felt that this justifies the skipping of the unit tests by the release workflow.
Here’s what that looks like.
release.yml – Validation
validate-release:
  name: Validate Release Candidate
  runs-on: windows-2022
  steps:
  - name: Fail If Not Default Branch
    if: github.ref_name != github.event.repository.default_branch
    uses: actions/github-script@v7.0.1
    with:
      script: core.setfailed('Can only create stable releases from the repository\'s default branch.')
  - name: Shallow Checkout
    uses: actions/checkout@v4
    with:
      submodules: true
  - name: Fetch Last CI/CD Run Conclusion
    id: check-last-run
    run: |
      Write-Output "LAST_RUN_CONCLUSION=$(.\build\Get-LatestWorkflowConclusion.ps1 -Repository:$Env:REPOSITORY -Branch:$Env:BRANCH -WorkflowPath:$Env:WORKFLOW_PATH)" >> $Env:GITHUB_ENV
    env:
      REPOSITORY: ${{ github.repository }}
      BRANCH: ${{ github.ref_name }}
      WORKFLOW_PATH: .github/workflows/ci.yml
      GH_TOKEN: ${{ secrets.REPO_TOKEN }}
  - name: Fail If Last Run Unsuccessful
    if: env.LAST_RUN_CONCLUSION != 'success'
    uses: actions/github-script@v7.0.1
    with:
      script: core.setFailed('Cannot create a stable release for a commit that resulted in a failed CI/CD run.')
The first step ensures that we’re only creating a stable release from our default main branch (we don’t want to source releases from feature or unstable branches).
Even if I were using release branches, I would probably still want the source for the release to be the current stable branch and then have the release workflow create the release branch as part of the process.
Push and pull request event-triggered workflows can be restricted to specific branches, but I’m not aware of a similar way to do that with manually triggered ones other than with a step to check and another to exit the workflow as we see in the above snippet.
We then fetch the conclusion of the branch’s most recent CI/CD run. If the conclusion returns as successful, we can permit the release to continue. We could verify that the commit SHA of the run matches that of the HEAD, but it goes to reason, given we trigger a CI/CD run on a push, that the latest run is for the current commit.
The “check step” calls the following script:
Get-LatestWorkflowConclusion.ps1
# Gets the result of the most recent run for a workflow.

param (
    [string]$Repository,
    [string]$Branch,
    [string]$WorkflowPath
)

$allRuns = gh api "/repos/$Repository/actions/runs" | ConvertFrom-Json
$workflowRuns = $allRuns.workflow_runs.Where({$_.path -eq $WorkflowPath -and $_.head_branch -eq $Branch})

if ($workflowRuns) {
    return $workflowRuns[0].conclusion
}
It’s pretty simple; I will probably expand on it. With just this, however, we have some guarantee now that we won’t be creating “stable” releases of unstable code.