Recently, I embarked on a new venture in life doing something I never thought I’d ever want to do: developing my (well, my and my wife’s) own computer game.
I decided early on that my weapon of choice for learning about and doing the game development would be MonoGame.
One of the first things I wanted to figure out was how to deal with the design and rendering of tile maps. After much learning, I recently added rudimentary support for the TMX map format to the Bad Echo Game Framework. Hooray!
While a lot could be written about how the tile maps work at large, I wanted to focus this article on one small part of the process: the rendering of the individual rectangular tiles.
How to Approach Rendering Tile Data?
One of the first rendering mechanisms you’ll come across when learning to draw 2D graphics with MonoGame is the ubiquitous SpriteBatch class. If we’re interested in rendering any sort of 2D sprite, actor, particle effect, etc., we’re more than likely going to be doing it using a SpriteBatch.
There’s a reason for this: the SpriteBatch class is pretty awesome at what it does. It does a great job at rendering most things that you throw at it, batching them in a very efficient manner, and drawing them all to the screen with the result being a highly performant experience.
Typical SpriteBatch Usage
_spriteBatch.Begin();

_spriteBatch.Draw(someTexture, new Vector2(200, 200), Color.White);
_spriteBatch.Draw(someOtherTexture, new Vector2(400, 400), Color.White);
// Insert more and more things for the SpriteBatch to draw...

_spriteBatch.End();
And this will render all of the many objects, actors, particles, or whatever else you feel like drawing just fine.
But what about the sometimes thousands upon thousands of tiles that need to be drawn when rendering a tile map? Does the typical way to render 2D graphics still cut it?
Screen-wide Tile Maps Require a More Specialized Solution
For most 2D games, it’s fairly safe to say that a sizeable majority of a screen’s real estate is going to be dedicated to the rendering of the active tile map. Tile maps are essentially the all-encompassing backgrounds of the game!
Although we might be able to squeak by just using a SpriteBatch, there’s also a very good chance we’ll start to run into its limitations. Although I’m still very much learning and cannot call myself an expert yet, I’ve read numerous times of performance problems with SpriteBatch when rendering large areas filled with many static textures (which, aside from animated tiles, basically describes a tile map).
To most efficiently render the large number of tiles found in a typical tile map, we’ll need to skip past the SpriteBatch middle man and communicate more directly with the GPU using vertex and index buffers, populated with 3D primitive data describing each tile.
3D Rendering for a 2D Tile Map?
Well, sure!
Don’t be fooled, there is no such thing as graphics that are purely 2D with today’s GPUs. All graphics, in the end, are 3D. It’s just that, in the case of tiles and other 2D graphics, we’re working with z-coordinate values that are always zeroed out.
Using vertex and index buffers, we can render thousands of 3D primitives with a single draw call, instead of needing to hit up SpriteBatch.Draw for every single tile.
I won’t be going too much into detail as to how vertex and index buffers work, but there are plenty of resources out there that’ll do the job just fine instead.
How to Render Tiles Using 3D Primitives
Primitives are the building blocks for 3D graphics, with each primitive usually being a simple triangle. In the end, all those fancy graphics you might see on your screen are probably a really big bunch of triangles smacked together.
So, to render a rectangular tile using 3D primitives, we’ll need to do so using triangles!
Getting the Shape Right
A triangle is not a rectangle; however, if we stick two triangles next to each other: a rectangle is exactly what we get! All we need to do, then, is define vertex data for two triangles that are adjacent to each other, and feed that data to the GPU.
Special consideration must be given, however, to the order in which the vertices for our triangles are indexed.
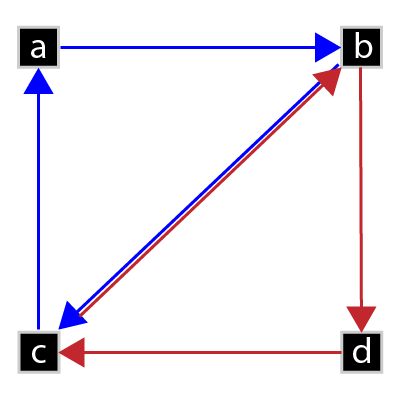
Both of the triangles must use a clockwise winding order for their vertices, as illustrated above. A triangle has a clockwise winding if its three vertices, in order, rotate clockwise around the triangle’s center.
Using the above two triangles as an example, we’d want to index the first triangle’s vertices in the order of (a, b, c), and the second triangle’s vertices in the order of (b, d, c).
If we define the second triangle’s vertices using a more natural order of (b, c, d), then that triangle will have a counter-clockwise winding. This is problematic, as polygons with counter-clockwise windings are treated as back-facing, and back-facing polygons are automatically culled (by default) by MonoGame.
Getting the Texture Right
If we follow the above steps, we’ll be able to easily render thousands of rectangular meshes: one for every tile in our maps. That would be a rather pointless endeavor, however, if we didn’t also map the texture for our tiles onto said meshes.
Tile maps use any number of tile sets as sources for the actual tile imaging data meant to appear on the map. Instead of loading a texture for each tile, we simply load a single texture for each tile set.
Using the tile set’s texture, we can render an individual tile by specifying a bounding rectangle of the region found in said texture where the tile resides. At least, this is how we do it when working with something like a SpriteBatch.
When dealing with 3D primitives and vertex buffers, we’ll instead need to make use of VertexPositionTexture values, which allow us to define texture-mapped vertex data. Unfortunately, if we want to use this approach, we need to define the source region of the texture using texels as opposed to normal screen coordinate pixels.
Mapping With Texels
Texels are essentially pixels normalized to the texture itself, describing a particular position within a texture, as opposed to a position within a greater plane. It is a two-dimensional (u, v) vector with values ranging from 0 to 1.
Let’s use the very crappy tile set I made for testing/development purposes as an example. The tile set is composed of four 16 x 16 pixel tiles, giving it a total size of 64 x 16 pixels.
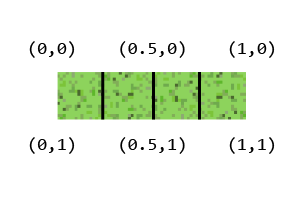
To further elaborate: instead of using (0, 16) to point to the bottom left corner of the texture, we’d use a (0, 1) texel.
Once we’ve figured out how to describe the texture regions being sourced using texel coordinates, we’ve got everything we need to render our tiles.
Tile Rendering Code
The Bad Echo Game Framework makes available a few types that help organize the generation and rendering of 3D models at runtime. Vertex data is added to and managed by a particular ModelData<TVertex> derived class, which is then fed to an IPrimitiveModel implementation that renders said data.
For tiles, I make use of the QuadModelData type (the term quad is a typical term for a four-sided polygon), which generates vertex data exactly in the manner just described in the previous section.
The star of the show is the AddTexture method, which takes several specifications about the texture region to map from, and then generates the appropriate vertex data.
Relevant QuadModelData Code
public void AddTexture(Rectangle textureBounds, Rectangle sourceArea, Vector2 position)
{
    float texelLeft = (float) sourceArea.X / textureBounds.Width;
    float texelRight = (float) (sourceArea.X + sourceArea.Width) / textureBounds.Width;
    float texelTop = (float) sourceArea.Y / textureBounds.Height;
    float texelBottom = (float) (sourceArea.Y + sourceArea.Height) / textureBounds.Height;

    var vertexTopLeft
        = new VertexPositionTexture(new Vector3(position, 0),
                                    new Vector2(texelLeft, texelTop));
    var vertexTopRight
        = new VertexPositionTexture(new Vector3(position + new Vector2(sourceArea.Width, 0), 0),
                                    new Vector2(texelRight, texelTop));
    var vertexBottomLeft
        = new VertexPositionTexture(new Vector3(position + new Vector2(0, sourceArea.Height), 0),
                                    new Vector2(texelLeft, texelBottom));
    var vertexBottomRight
        = new VertexPositionTexture(new Vector3(position + new Vector2(sourceArea.Width,
                                                                       sourceArea.Height), 0),
                                    new Vector2(texelRight, texelBottom));

    AddIndices(VertexCount);

    Vertices.Add(vertexTopLeft);
    Vertices.Add(vertexTopRight);
    Vertices.Add(vertexBottomLeft);
    Vertices.Add(vertexBottomRight);
}

private void AddIndices(int offset)
{
    Indices.Add((ushort) (0 + offset));
    Indices.Add((ushort) (1 + offset));
    Indices.Add((ushort) (2 + offset));
    Indices.Add((ushort) (1 + offset));
    Indices.Add((ushort) (3 + offset));
    Indices.Add((ushort) (2 + offset));
}
The output here is fed into an IPrimitiveModel implementation, which will load the data into the appropriate types of vertex and index buffers. IPrimitiveModel.Draw then takes the loaded buffers and makes the magic happens with a single call to DrawPrimitives / DrawIndexedPrimitives.
Relevant PrimitiveModel Code
public void Draw(BasicEffect effect)
{
    Require.NotNull(effect, nameof(effect));

    if (_texture != null)
    {
        effect.TextureEnabled = true;
        effect.Texture = _texture;
    }

    Device.SetVertexBuffer(VertexBuffer);

    if (IndexBuffer != null)
        Device.Indices = IndexBuffer;

    foreach (var pass in effect.CurrentTechnique.Passes)
    {
        pass.Apply();

        if (IndexBuffer == null)
            Device.DrawPrimitives(PrimitiveType.TriangleList, 0, _primitiveCount);
        else
            Device.DrawIndexedPrimitives(PrimitiveType.TriangleList, 0, 0, _primitiveCount);
    }
}
And that’s how 3D rendering techniques end up getting used to render giant blobs of 2D rectangular tile data. Works like a charm!