
As work continues on my secret Bad Echo game and its accompanying (and public) Bad Echo Game Framework, my (initially quite limited) experience with game development has slowly grown.
Given how new I (still) am to game programming, I haven’t had the opportunity to write any articles as of late, as most problems I’ve been encountering have more to do with my inexperience with the subject matter (and therefore don’t warrant writing an article about them).
But it’s simply been too long! So an article I must write. And today’s will deal with clipping regions in MonoGame: what they are, what they do, and how to use them. Let’s keep this nice and short!
Out of Bounds Text!
I first became acquainted with the notion of clipping regions when designing a user interface framework for the Bad Echo game library.
The user interface framework contains several controls such as Label, which will display text. Here’s an image showing a label inside a parent layout panel.
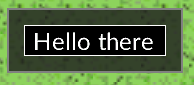
The width and height of a control may be either explicitly set or left alone, leaving it up to the layout system to figure out the dimensions needed to display the content.
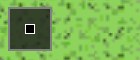
At one point, I tried to set the width and height to a small value, to see what the label control ended up looking like.
The content of a control is restricted to the Rectangle value its ContentBounds property is set to; naturally, I expected the text content of our label control to no longer be visible if its permissible bounds were reduced such that said content could no longer fit.

Oops.
A Look at the Drawing Code
With Control derivations, the ContentBounds property is typically sourced in the control class’s overridden DrawCore method when drawing its content.
The typical SpriteBatch.Draw overload we use is one accepting a destination Rectangle value that specifies the coordinates on the screen for drawing the sprite.
If the destination rectangle is too small to support our content, we shouldn’t really see anything, right?
Label.DrawCore Snippet
Vector2 contentPosition = ContentBounds.Location.ToVector2();

spriteBatch.DrawString(Font, Text, contentPosition, Color.White);
Uh oh, looks like the SpriteBatch method for drawing SpriteFont text doesn’t actually accept a destination Rectangle value in any of its overloads, but rather a straight up Vector2 position.
Is there any way we can apply a constraining region for our control such that any part of the sprite outside of said region’s bounds is clipped?
Yes. Scissors and Clips.
The GraphicsDevice.ScissorRectangle property allows you to set an effective clipping region. Anything drawn outside this region during the current render pass will not be displayed on the screen.
By default, this property is going to be set to the active viewport, that is (by default) the window or screen that the game is running on.
We take a stack-like approach in regards to using this property, essentially pushing the current value onto a local variable, and then popping the value back onto GraphicsDevice.ScissorRectangle when we’re done with it.
The Control.Draw method, which calls the overridden Control.DrawCore method, ends up being the perfect place to enforce the derived control’s ContentBounds value as the clipping region.
Control.Draw Snippet
Rectangle clippingRectangle = spriteBatch.GraphicsDevice.ScissorRectangle;

spriteBatch.GraphicsDevice.ScissorRectangle = ContentBounds;

DrawCore(spriteBatch);

spriteBatch.GraphicsDevice.ScissorRectangle = clippingRectangle;
Setting up the SpriteBatch
Before the above code can have any sort of effect, we need to change the configuration for our SpriteBatch instance when beginning our sprite batch operation.
The Proper Drawing Order
The first parameter to SpriteBatch.Begin is a SpriteSortMode value that specifies the sprite drawing order. The default value for this parameter is SpriteSortMode.Deferred, which defers the drawing of all sprites until we make the call to SpriteBatch.End.
This default behavior clearly won’t work for our purposes, given the stack-like approach we’ve taken in manipulating the GraphicsDevice.ScissorRectangle property.
Remember, we’re temporarily setting the clipping region to the control’s ContentBounds value, letting the derived control make its SpriteBatch.Draw calls, and then restoring the old GraphicsDevice.ScissorRectangle value.
These temporary clipping regions get ignored if we use a deferred sprite drawing order; the clipping region returned by GraphicsDevice.ScissorRectangle at the point in time SpriteBatch.End is called gets applied to every sprite in the batch instead.
So, we’ll want to make sure that we pass a value of SpriteSortMode.Immediate instead, which will cause the sprites to get drawn each time SpriteBatch.Draw is called.
The Proper Rasterization
The SpriteBatch.Begin method also accepts a RasterizerState parameter, which configures how vector data (shapes) are converted into raster data (pixels).
If we want to enable clipping, we need to make sure the RasterizerState.ScissorTestEnable property is set to true. A scissor test is an operation that culls all pixels outside of a scissor rectangle (i.e., our clipping region).
So, with all of that in mind, we make sure our SpriteBatch operation is begun properly, as the following snippet demonstrates:
SpriteBatch.Begin Snippet
spriteBatch.Begin(SpriteSortMode.Immediate,
                  blendState: BlendState.AlphaBlend,
                  rasterizerState: new RasterizerState { ScissorTestEnable = true });

screen.Draw(spriteBatch);

spriteBatch.End();
And we end up with the following results:
Everything Working as Expected!
Yes indeed. A clipping region lets us enforce a rectangular limit on what we wish to draw.
And thus concludes this very short, and to-the-point, article.